Wednesday 28 October 2015

Payment Schedule Creation in Contracts and Invoices for the Purchase Order

There is a new feature introduced from Maximo 7.5 which allows users to schedule payments. You can use the Contract Line Items tab in the Contracts application to create a schedule of payments for the contract line items. I am going to present some scenarios where this feature can be useful and how the invoice is created for the same.

Points of Consideration and Scenarios for Payment Schedule functionality:

  1. Payment Schedule can be created for each contract line.
  2. Before you can create a payment schedule, you must select the Payment Schedule check box on the Properties tab.
  3. Out of the box payment schedule can be used to create Invoice on PO Approval and Receipt of Materials:
    • Payment Percent should be selected such that line cost of each milestone do not exceed total line cost.
    • For Example: A contract line has total line cost as 1000,
      • Payment % for action POAPPR= 10, line cost=10% of 1000=100
      • Payment % for action RECEIPT=90, line cost=90% of 1000=900
  4. Scenario 1: Contract Line with Qty=10, Unit Cost=100, Line Cost=1000,
      • Payment Schedule 1: Action=POAPPR, Payment Percent=10, Line Cost=100
      • Payment Schedule 2: Action=RECEIPT, Payment Percent=90, Line Cost=900
    • On PO approval, one invoice is created as: Invoice Qty=Ordered Qty=10, Unit Cost=10% of 100=10, Invoice Line Cost=100
    • On partial receipt of 6 items, one invoice is created as: Invoice Qty=90% of Received Qty=90% of 6=5.4, Unit Cost=100, Invoice Line Cost=540
    • On receipt of remaining 4 items, one invoice is created as: Invoice Qty=90% of Received Qty=90% of 4=3.6, Unit Cost=100, Invoice Line Cost=360
  5. Scenario 2: Contract Line with Qty=10, Unit Cost=50, Line Cost=500
      • Payment Schedule 1: Action=RECEIPT, Payment Percent=100, Line Cost=500
    • On Partial Receipt of 5 items, one invoice is created as: Invoice Qty=100% of Received Qty=100% of 5=5, Unit Cost=50, Invoice Line Cost=250
    • On Partial receipt of 3 more items, one invoice is created as: Invoice Qty=100% of Received Qty=100% of 3=3, Unit Cost=50, Invoice Line Cost=150
    • On receipt of remaining 2 items, one invoice is created as: Invoice Qty=100% of Received Qty=100% of 2=2, Unit Cost=50, Invoice Line Cost=100
  6. Scenario 3: Contract Line with Qty=10, Unit Cost=100, Line Cost=1000
      • Payment Schedule 1: Action=RECEIPT, Payment Percent=20, Line Cost=200, Days Interval=7
      • Payment Schedule 2: Action=RECEIPT, Payment Percent=80, Line Cost=800, Days Interval=7
    • On partial receipt of 5 items, two invoices are created as:
      • Invoice Date=7 days after receipt, Invoice qty=20% of Received Qty=20% of 5=1, Unit Cost=100, Invoice Line Cost=100
      • Invoice Date=30 days after receipt, Invoice qty=80% of Received Qty=80% of 5=4, Unit Cost=100, Invoice Line Cost=400
    • On partial receipt of 2 more items, two invoices are created as:
      • Invoice Date=7 days after receipt, Invoice qty=20% of Received Qty=20% of 2=0.4, Unit Cost=100, Invoice Line Cost=40
      • Invoice Date=30 days after receipt, Invoice qty=80% of Received Qty=80% of 2=1.6, Unit Cost=100, Invoice Line Cost=160
    • On receipt of remaining 3 items, two invoices are created as:
      • Invoice Date=7 days after receipt, Invoice qty=20% of Received Qty=20% of 3=0.6, Unit Cost=100, Invoice Line Cost=60
      • Invoice Date=30 days after receipt, Invoice qty=80% of Received Qty=80% of 3=2.4, Unit Cost=100, Invoice Line Cost=240

Example for Scenario 1

  1. Created one Purchase Contract with one contract line with payment schedule as below:
    • OrderQty=10, Unit Cost=100, Line Cost=1000
    • Payment%=10, Action=POAPPR, Line Cost=100
    • Payment%=90, Action=RECEIPT, Line Cost=900 
  2. PO created for the above contract and approved as below: 


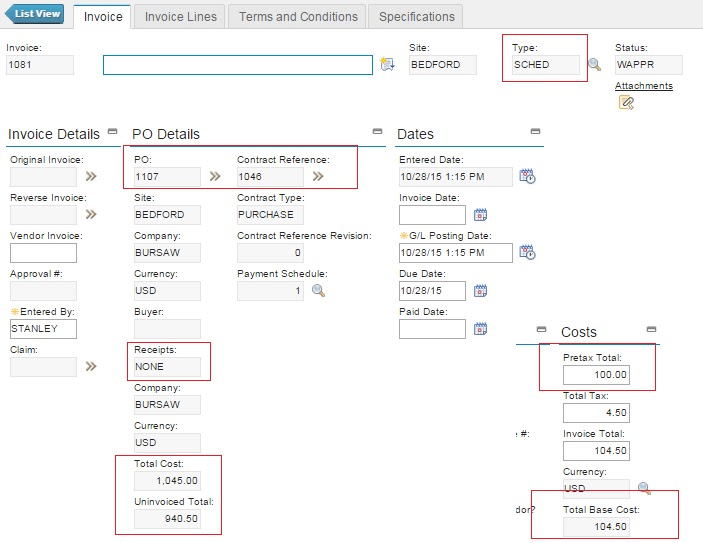
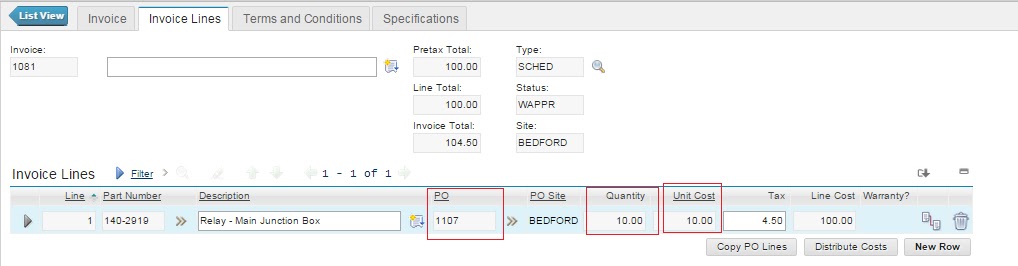
  3. On PO approval, an invoice is created as below with Pretax Total = 10% of 1000 = 100 USD:
                                            Check the values in Total Cost and Uninvoiced Total fields. Also, check the Invoice Line details as below: Qty=10, Unit Cost=10% of OrderQty=10, Invoice Line Cost=100
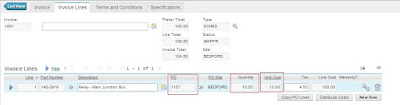
  4. Receiving 6 items out of 10 ordered for Partial Receipt as below
                                                           
  5. One invoice is created for the above partial receipt as below: 
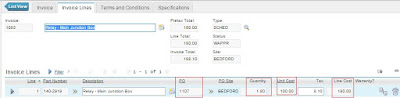
    Uninvoiced Total = 376.20                                           Check the Invoice Line details as: Unit Cost=100, Invoice Qty = 90% of Received Qty =    (90x6)/100 = 5.4, Line Cost = 540
  6. Receiving 2 more items as below: 
  7. Invoice created for above receipt as below: 

                                         Check the Invoice Line details as: Unit Cost=100, Invoice Qty = 90% of Received Qty =    (90x2)/100 = 1.8, Line Cost = 180.
  8. Receiving remaining 2 items as below: 
  9. Invoice Created for above receipt as below: 
                                                  Note that Receipt is now Complete and Uninvoiced Total=0. 
                                                   Also, check Invoice Line details as:  Unit Cost=100, Invoice Qty = 90% of Received Qty =    (90x2)/100 = 1.8, Line Cost = 180.
I hope this blog will help people in understanding how this feature works. Please feel free to share your comments.

Tuesday 29 September 2015

Inventory Cycle Counting in Maximo

As per the Wikipedia on Cycle Counting, it is an inventory auditing procedure, which falls under inventory management. Inventory Cycle Counting is the process of continually validating the accuracy of the inventory in your system by regularly counting a portion of your inventory on a scheduled basis, so that every item in your inventory is counted within a set time period appropriate for the item.

Cycle Counting is the process of counting inventory items throughout the year on a schedule so that all items are counted at least once a year. The cycle counting approach in Maximo is a technique that segregates or categorizes inventory based on an ABC analysis and sets up a time schedule for when items should be counted throughout the year so that when the time frame of one year passes, all items have been counted at least one time.

ABC Analysis – Selective Inventory Control Usage in Maximo

ABC Analysis, also known as Selective Inventory Control is used for categorizing inventory into three categories, A, B, and C. It is a technique that identifies the items that represent the greatest investment for your department in terms of monetary value and turnover rate. The three categories are defined as:
  1. A Items: very tight control, high cost, complex parts - requires most management attention
  2. B Items: less tightly control, medium cost, medium complexity
  3. C Items: simplest control possible, low cost - marginally important
The ABC approach states that, when reviewing inventory, a company can also rate items from A to C, basing its ratings on annual consumption value, with highest for ‘A’ items, medium for ‘B’ items and lowest consumption value for ‘C’ items. The ABC Type value for an item is determined by running an ABC Analysis report, which multiplies the current YTD issued quantity by the last cost of the item. The items are then sorted in descending order of the dollar value reached by this calculation. MAXIMO sets the type to A, B, or C based on a percentage that the system administrator sets in in the Inventory Defaults dialog box in the Organization's application. You can set the ABC type to N, for no category, to exclude this item from the ABC analysis.

Also, system has the provision to record the cycle count at each item level in Inventory application. In Maximo, it is located in Inventory Module > Inventory application > Inventory tab > ABC Analysis section. 

In Maximo, system employs the ABC analysis as a cycle count tool to assist with the Inventory physical count process. The administrative settings allow an organization to group its items into A, B, or C categories and determine at what interval an item needs to be physically counted and reconciled (if the physical count and bin balance do not match) to the Maximo system balance. The breakpoint percentiles are designed to support a standard Maximo Inventory report, the Inventory ABC Analysis report.

The ABC Analysis report assists users in determining the ABC value of an item by multiplying its historical issue volume by the unit cost. The below listed steps can be followed for classifying items:

Find out the unit cost and the usage of each material over a given period (say one year).
Maximo stores historical data for Issue and Return transactions each year (or for any user-defined period) in the inventory table. Year to Date (YTD) quantities refer to the number of items issued from a specific storeroom location for the current year. The 'zero year to date quantities' action is found in the Inventory application. It is manually initiated by the user either at the beginning or the end of a material management time period.

By adjusting the YTD quantities, Maximo will move all year to date quantities back one year and change the current year to date quantity to zero.
Year to Date Quantity (INVENTORY.ISSUEYTD) specifies the Total year-to-date quantity issued from this location for the current year. Last Year quantity (INVENTORY.ISSUE1YRAGO) specifies the Total year-to-date quantity issued from this location for the previous year.
Multiply the unit cost by the estimated annual usage (INVENTORY. ISSUEYTD) to obtain the net value. List out all the items and arrange them in the descending value (Annual Value). Accumulate value and add up number of items and calculate percentage on total inventory in value and in number.

For example, let us assume that we have below set of breakpoints for A, B, C type for the Organization:
The following table is an example of an ABC ranking and classification:

Cycle Counting Procedure

The process of running an Inventory Cycle Count, in Maximo, involves printing of the Inventory Cycle Count report, manually performing the inventory count, and reconciling the quantity information in the Maximo Inventory application.

Inventory managers can develop scheduled reports to manage cycle count assignments. Managers can use the ABC Analysis tool to prioritize inventory as presented in above section. Once the inventory cycle count frequency is established, inventory managers can distribute cycle count reports to their team to perform the actual counts. The reports can be configured to restrict the data that is presented to the person performing the count. The person performing the inventory count will rely on the provided cycle count report which defines what items to count by storeroom locations, bins, etc. Once the cycle count is complete, the results can be entered in the system. The related inventory item balance can be adjusted by reconciling the actual count with the recorded inventory count.

  1. Inventory Cycle Count Report is available out of the box through the Run Reports action in the Select Action menu of Inventory Application. Enter or select the Storeroom and Site in the Request Page dialog box.
  2. The person performing the cycle count will receive the report.
  3. The report can be printed and the quantities entered on the paper for later manual entry into the Inventory application.
  4. When the manual cycle count is complete, the results must be entered into the system in order to reconcile the system expected balances with the actual physical inventory balance. This process is performed using the Inventory Adjustments > Physical Counts action in the Select Action menu of the Inventory application. Security configurations can be set so that inventory adjustment function is accessible to authorized group(s) or person(s) only. From the Inventory application, the authorized user can filter the list based on the storeroom/site, and select Inventory Adjustments > Physical Counts to begin the bulk adjustment. A warning message appears to inform users that they are about to perform a bulk adjustment. 
     
                                                                                                                     In the Physical Count Adjustment dialog box, each record is displayed along with the Physical Count from the current system inventory. Count Date field contains the system date, user can change it accordingly. User can enter the actual count from the previous step in the New Count field. 


  5.        Clicking OK in the Physical Count Adjustment dialog box, will complete the adjustment process. 

Thursday 3 September 2015

Confusion over data load/migration using Migration Manager and Maximo Integration Framework

Usually in layman terms, whenever we are talking about migration we refer to data migration. It may be related to data load/migration from a legacy system to Maximo, or it may be related to data load to Maximo tables. But Migration Manager application(s) in Maximo enables a structured set of steps to promote configurations from one product environment to another. Migration Manager helps to export the configuration changes made on the development environment in a package and helps to import the package into a test or production environment.

I had come across an interesting query that whether we are using migration manager or the integration framework we create an object structure, which allows to create the data model which will be used for import/export. And, we import/export data related to an object, and the configuration changes also get saved in Maximo objects. So, why don’t we use Integration Framework instead of Migration Manager to import/export the configuration changes using XML or flat files? To answer this we need to understand the purpose of these

The purpose of Maximo Integration Framework is used to manage the transactional integration to external applications and is used for export and import to and from external applications or existing applications. The MIF supports primarily the master and transactional data. The purpose of Migration Manager is used for package-based configuration export and import between similar production environments. Migration Manager supports import/export of metadata (configuration data).

To understand the usage of each framework, we need to understand which one we should select to execute the required tasks. For example, a developer has implemented a workflow for incident management using TPAE (Tivoli Process Automation Engine) Workflow Designer and related applications like, Roles, Actions, Communication Templates, etc. This workflow needs to be promoted to Test and Production environments. In this case we are going to use migration manager. We bundle all the related metadata (configuration changes to actions, roles, communication templates, workflow process, etc.) to a package definition using object structures and migration groups, create a package, and distribute the package in the development environment. This package is then imported and deployed in the test or production environment. This way the workflow for incident management is made available in the test or production environment.

Let us consider one more example. We have a set of requirements for which we have created two custom objects. We have created new domains and relationships to new or existing objects. Based on these configuration changes we have made some changes to the Preventive Maintenance application. We need to migrate the configuration changes to a UAT environment before deploying into the Production environment. Here also, we need to use the migration manager.

Let us consider another scenario where we need to integrate Tivoli Asset Management for IT with asset discovery tool TAD4D or we need to integrate the Tivoli Service Request Manager to an external ticket management application and also the historical tickets need to be loaded into Tivoli Product. Integration Framework (MEA) is the choice in this case. Existing data, such as tickets, can be loaded into Tivoli Service Request Manager using a number of methods, including flat files, interface tables, or XML. Further, we may need to add 500 asset records. We will use MEA for loading the data for 500 records into the Asset object.

Now there is a need to migrate foundation data, which is also known as the implementation data, from development to production to avoid having to re-enter huge amount of data, such as locations and classifications, units of measure, currency codes etc., in the production environment. Some people like to call it as Reference Data also. Typically, this type of data consists of discrete sets of data that do not have multiple or deep relationships with other data. The Migration Manager can be used to migrate such foundation data. However, with its queue based processing, message processing and resubmission capability, using MIF to load foundation/reference/implementation data is more efficient that using migration manager framework.


With this we can come to a conclusion that data load/migration from one Maximo environment to another or from external system to Maximo, we need to keep in mind what type of data we are migrating or promoting. When we refer to metadata, i.e. data about data, like configuration changes, we would be using migration manager. And when we refer to master or transactional data and reference/implementation data, we should selectively use the Integration Framework.

Thursday 27 August 2015

2way / 3 way / 4 way matching in Maximo

I have come across queries related to invoice matching in many occasions. What type of matching does Maximo support? Is it a three way matching or four way matching? For some of us who are not familiar with accounting, these questions lead you to a black hole.

The three way match refers to a procedure followed to avoid paying incorrect and fraudulent invoices and is used when processing an invoice received from a vendor or supplier. An invoice that is received from a supplier will be approved and paid by an organization if the purchase order and receiving report prepared by the organization are in compliance. That is in the world of maximo, we need to concentrate on the Invoice(s), Purchase Order(s) and Receipt(s) for a three way match. And the match refers to comparison of quatities, unit prices, total cost, etc. presented in the invoice record with the information on the PO and PO Line Items in the Purchase Orders application and the quantities that are actually received in the Receiving application against each PO line item. So the comparison points are:

  1. Quantity billed Vs. quantity ordered
  2. Invoice cost Vs. PO cost
  3. Quantity billed Vs. quantity received

After the invoice has been validated by this three way match, it can be paid by taking into consideration tolerances if any. 

The four way matching refers to a process when an invoice is matched with the corresponding purchase order for quantity and amount, receiving and, inspection details. In Maximo Purchase Orders application, we can create a purchase order for a material and mark both the checkboxes Inspection Required?  and Receipt Requied? against it. 

Alternatively, in the Item Master application, you can keep the checkbox Inspect on Receipt? checked for an item. When you select that item for a line in the PO, the Inspection Required? checkbox is marked automatically for this PO Line item.

So when you go to the Receiving application to generate receipt of the material and select the ordered item(s), you can check that material with transaction type RECEIPT is in status WINSP (Waiting for inspection). 
Now you need to change the inspection status where you are presented to enter accepted and rejected quantity. 
After changing the inspection status, you can check one more row for the material with transaction type TRANSFER and status COMP. You can also see that the material has now come from the holding location to the storeroom location of the site.

In this case, we see a four way matching as invoices are matched with purchase order, receiving information and inspection information. The comparison points in this type of matching are:

  1. Quantity billed Vs. quantity ordered
  2. Invoice cost Vs. PO cost
  3. Quantity billed Vs. qunatity received
  4. Quantity billed Vs. quantity accepted
Now there is another question, if I create a puchase order with a line item for which the checkbox for Receipt Requied? is not checked. In that case maximo allows a two-way matching as invoices are matched with the purchase order only. The comparison points in this type of matching are:

  1. Quantity billed Vs. quantity ordered
  2. Invoce cost Vs. PO cost. 

So to answer the query about procurement and invoicing in Maximo, it supports two-way, three-way and four-way matching for invoices.

Tuesday 25 August 2015

Checklist for Flat File Imports

We are familiar with flat file imports using Maximo Integration Framework and it seems any layman will work it out. But to err is human so we tend to forget (intentioanally or unintentionally) some very familiar and simple steps that would actually make us save time banging our heads when we face encounter errors.

So, here is a checklist to consider while we are creating object structure, enterprise service and external system for flat file import through MIF.

We all are aware that for flat file upload first step is to create an object strucure. We need to remember that we need to select INTEGRATION in consumed by field and we need to select the checkbox of Support Flat Structure? We move on to select the main object, other objects (if any) with selecting the parent object as the main object and selecting the required relationship. We save the object structure. We need to follow the below steps:
  1. Select Action > Exclude/Include Fields - this is required to select the fields from main object and all child objects which will be kept in the flat file. 

  2. Select Action > Add/Modify Alias - this step might be required if there are same attribute names in main object and child object(s). In this case, after saving the object structure the Alias Conflict? checkbox will be marked automatically. After renaming the duplicates, this checkbox will be cleared. 

  3. Select Action > Inbound Setting Restrictions - this steps is required if we want MIF to use the autokey functionality for some field. If it is not restricted in the object structure MIF expects data in the flat file. For example, we are loading asset data and required attribute assetnum has a autokey defined in its object. We keep the values for this column blank in the flat file but while importing the flat file, we get an error  "BMXAA4195E - Requred field XXX is blank". To avoid getting this error this step is mandatory and we tend to forget this step frequently.


We move on to create the Enterprise Service for our inbound transaction. We associate out object structure, select adapter as MAXIMO and operation as SYNC.

Next step is to create an external system for which end point should be MXFLATFILE. Outbound sequenetial queue, inbound sequential queue, and inbound continuous queue should be entered and Enabled? checkbox should be selected. Then we go to the Enterprise Services tab and associate the enterprise service createt and uncheck the checkbox of Use Continuous Queue?

Next step is to get ready with our flat file. Flat file should be with extension .dat and first row in the file should consist of External System Name, enterprise service name, action (Add/AddChange/Change/Delete/Replace/null), and language. Second row consists of all the column names specified in Exclude/Include Fields window of the Object Structure. Third row onwards consist of the data to be imported. Ensure to remove extra commas from the flat file.

Now from the Enterprise Services tab in the External Systems application, select the enterprise service for which you want to import the flat file and click on Data Import button.Select the radi box for Flat File and select the checkbox Import Preview? Choose the flat file and click OK.
If you get a message "BMXAA5621I - The data import preview mode is successful", then again click on Data Import button. Select Flat File radio button and this time do not select the Import Preview? checkbox. Choose the same flat file and click OK. Your data should be imported successfully.

PS: For better error tracking and management, you should also enable message tracking in the Enterprise Service. From the select action menu, choose option Message Tracking and in the Message Tracking Setting dialog window, check the Enable Message Tracking? checkbox.

Reversed Invoice and cost adjustments to line item

I would like to explain about one scenario where a PO gets closed when the invoice goes to paid status, but then there is a requirement to make changes in the PO Line item cost and invoice needs to be changed accordingly.

The checkbox to close the PO was checked on changing the invoice status to PAID in the maximo Invoice application. So, the status of the PO gets changed from APPR to CLOSE when invoice status is changed to PAID. Now there we came across a situation where we created a PO with one PO line item with incorrect tax code but we realized the error when the invoice for this PO was already paid. We did not want to revise the PO and go through the approval process again. So here is a solution to reverse the invoice and make changes to the PO Line item or Invoice Line item as described below.

The first step would involve the reversal of the paid invoice. As discussed in my previous blog, from the paid invoice record, you need to choose the option Reverse Invoice from the select action menu and select autonumber to create a new invoice in pending reversal status, with reversal reason, G/L posting date, etc. A new invoice is created with status as PENDREV and negative entry in the cost fields and with a reference of the original invoice number. When you change the status of the new invoice to APPR, the status of the old invoice gets changed from PAID to REVERSED.


The second step would be to create a new invoice with the same PO number and site details. You need to go to the Invoice Lines tab, and you can check the uninvoiced quatity for the line item when you select the Copy Lines button. Select the line item accordingly and make the necessary changes to the tax code.

You can verify that in the Invoice tab that invoice total and total base cost has been changed accordingly. You can also verify that total cost of the PO is not changed and it is as per the original invoice.
Now the process of changing Invoice status to approved and then to paid remains the same. This way you are saved of PO revision and approval process and changes or adjustments can be made at the Invoice application only as per your requirements.


Monday 24 August 2015

Query Based Reports and Cardinality

I would like to draw your attention towards a very simple yet important fact about query based reports which we create on the fly in Maximo. All of us are aware that running an adhoc report from any Maximo appication, requires an Report Object Structure and user will only see the ROS he/she has access to. 

I came across an error once while running one adhoc report from Incident application which actually prompted me to look towards this end. My clients asked me to show one report to list out all the closed incidents with the cause and resolution fields. So, I simply opened the Incidents application, selected all the closed incidents and clicked on Create Report button and selected Summary report in Style tab. In the Select tab of Query Based Report dialog window. I select the required fields from main INCIDENT object, long description text (LDTEXT) from FR1CODE object labeling it as Cause and also selected  long description text (LDTEXT) from FR2CODE object labeling it as Resolution. I was shown a warning message as below:
"BMXAA7325W: The fields you have selected contain multiple relationships, therefore the report style will be changed to a Detail format to support these fields. Any defined groups will be cleared. Click OK to continue, or click Cancel to cancel the field selection."

The list report that got displayed had Resolution fields in separate section below the Incident record(s) fields. As per QBR and Reporting in Maximo, during the report creation process, the category relations are evaluated to determine if there are single or multiple relationships with the main object. Any number of categories with Single Relationships can be added to the QBR. However, when categories have Multiple Relationships, different business rules are invoked. If the user has selected a Summary report, only 1 Category with a Multiple Cardinality can be included. If the user tries to select fields from multiple categories with 1:N relationships, he will be given the choice to either change his style type to Detail, or to remove the field selection. 

I had to go check the object structure for this one. There was the INCIDENT object as parent object. FR1CODE and FR2CODE were list as child object(s) to INCIDENT object. I could see that for both these objects, parent object was INCIDENT, object order was 1 and relationship(s) were also correct, but the cardinality was 'UNDEFINED'. The cardinality value usually defaults to UNDEFINED, which assumes a multiple relationship (one to many or 1:N). Always try to select the relationship type that is applicable. In this case it should have been SINGLE. 

I hope this helps someone.

Invoice Reversal in MAXIMO 7.5

I would like to draw your attention towards a functionality of Reversing Invoices in Maximo 7.5. There may be some requirement when you need to cancel an approved/paid invoice to make corrections due to say typos in the original invoice. I had been asked by my client to define a process where they had faced a similar issue and they did not want to go through the whole process of returning transaction. There is an out of the box option available in the Select Action menu in the Invoice application which allows a user to reverse an already approved/paid invoice.

In the original invoice, you can select the option of Reverse Invoice from the select action menu. You will be presented with two statuses – PENDREV and APPR. If you select Pending Reversed status, a new reverse invoice will be created where the original invoice number will be stored in the ORIGINVOICENUM attribute and the new reverse invoice number will be stored in the original invoice’s REVINVOICENUM attribute. All the invoice information, invoice lines and invoice line costs will be duplicated from the original invoice to the new invoice.

If you select APPR status while reversing an original invoice, Maximo Invoice application will insert all the related records that were created by the original invoice/credit/debit memo by setting opposite values in the new invoice. The new Reverse Invoice status will be set as APPR and the original invoice status will be set as REVERSED. The new inserted related records will follow the same business rules as the original invoice and any variances previously created will be reversed and appropriate costs will be updated in
-          INVOICEMATCH
-          INVOICETRANS
-          MATRECTRANS
-          MATUSETRANS
-          SERVRECTRANS
-          INVENTORY.AVERAGECOST
-          INVENTORY.LASTCOST
-          INVVENDOR.LASTCOST

In the Invoice Application, from the select action menu choose option Reverse Invoice. You are required to enter a Reversal Reason and G/L Posting Date.

A new invoice gets created with negative entry and reference to original invoice number.

On changing the status of the new invoice from PENDREV to APPR, the status of the original invoice changes to REVERSED.

References-


Wednesday 5 August 2015

How complicated configdb can be?

Everyone would ask me how complicated a configdb can be for a maximo application. Yes it is very simple. You turn the admin mode on from database configurations application and then apply configuration changes and turn off the admin mode. I understand that you can even run configdb.bat or configdb.sh from command prompt, but what if you run into errors here.

I know some of you would think I have gone crazy. Yes, I had gone crazy scratching my head when I ran into error(s) while running configdb. I was working for one organization then where the team used to think if you can't figure out what to do next, run a complete database import. It was termed as classic jugaad (or jugaar which means workaround) of all times. But because of this, as a maximo user/developer I faced various issues.

We were deploying or moving some changes into production where we had only 1-2 hours of downtime and we had move a lot of changes to existing objects in Maximo so we had to apply the configuration changes and keep production system ready during that time window. From the command prompt, we ran the command configdb.bat and a series of errors we encountered.

Below are a few examples of errors we ran into and their resolution steps:

  1. reorg_pending error in alter table - access the DB server and run the command                           db2 reorg table <tablename>
  2. existing tables were not restored from backup - access the maximo database instance and run the SQL queries 
    • select restoredata from maxtable where tablename=<tablename>
    • select restoredata from maxtablecfg where tablename=<tablename>
    • If any of the above query returns 1, we need to update this value to 0 in order for configdb to run successful.

PS: We were using DB2 database.

All about that Internal 500 error

We amateurs have faced many a times this cumbersome Internal 500 error while accessing maximo URL. Well, I have faced it many times. So I would like to share my experience and hopefully somebody might get some help while troubleshooting.

When you try to open the maximo url and it is really frustrating to see the Internal 500 error. We all know that this is definitely related to database connection. Don't lose your head and check the following:

  1. Database password might have expired. Try to connect to the database instance with your credentials, if it says password expired, reset the password (with DBA's help if needed) and restart your server.
  2. In case above step does not help you, check if configdb is running or admin mode is ON.
    • Run the SQL query "select varvalue from maxvars where varname='CONFIGURING'", if it returns 1, update varvalue to 0.
    • Run the SQL query "select vavalue from maxvars where varname='ADMINRESTART'", if it returns ON, update varvalue to OFF.
I know most of us have already figured out the above obvious checks by now. But I had run into 500 error beyond this too. The maximo.ear file was rebuilt and redeployed. After the server was restarted, we were ready to see the wonders our Java code has created but instead we were shown an Internal 500 error. We double and triple checked for password expiry, running configdb or admin mode ON, but could not track our culprit. Here the problem was encrypted password.

So the resolution steps followed in this case are:
  1. From the folder path [IBMSMP]\maximo\applications\maximo\properties, open the file maximo.properties. Modify the file with mxe.db.password=<database password> and set mxe.encrypted=false.
  2. Run the command encryptproperties.bat from [IBMSMP]\maximo\tools\maximo path.
  3. Rebuild the maximo.ear file and redeploy it. Restart the server.
Hopefully, you will be rid of Internal 500 error by now.