Friday, 12 January 2018

The Powerful Dot Notation in Maximo

We are familiar with displaying additional information through a relationship in Maximo. If I want to display the asset's serial number in Work Order Tracking application when the asset field is populated, I just have to add a textbox in Application Designer for WOTRACK application and reference the RELATIONSHIPNAME.ATTRIBUTENAME in the attribute property of the textbox. For the WORKORDER object, there exists an OOB relationship "ASSET" to the child table ASSET. So, I need to simply use ASSET.SERIALNUM in the attribute property of the textbox. When an asset is entered in the Work Order record, this textbox will display the serial number.

Maximo relationships are same in terms of SQL joins and we are aware that even multilevel relationships can be used in Maximo. For example, if I have to send a notification to the affected person from a Service Request once it is created. In the communication template for this notification, I can specify a dataset role on SR object, in which value will be :AFFECTEDPERSON.EMAIL.emailaddress. AFFECTEDPERSON is the first level relationship name from parent object TICKET to child object PERSON and EMAIL is the next level relationship name from parent object PERSON to child object EMAIL. This will help is identifying the email address to which notification should be sent.

If we need to set a value in a field from a related field on some condition, we can use the dot notation here too. We have to set the value of the purchase agent of a PO with the value of the ship to person. We can create an action on PO object of type SETVALUE for parameter/attribute PUCHASEAGENT and in the value we can associate the ship to person ID using :SHIPTOPERSON.personid, where SHIPTOPERSON is the relationship name from parent object PO to child object PERSON. We can now reference this action from either a workflow or escalation whichever is applicable.

We can use the dot notation in building conditions also in Conditional expression manager. For example, a condition can be created to check if the bin number in related inventory balances record is same as default bin of inventory record, :invbalances.binnum = :binnum, where INVBALANCES is the relationship from parent object INVENTORY to child object INVBALANCES.

In recent times, we have also seen the extension of this powerful dot notation to result set portlets. I have tried this in Maximo 7.6. I create an object structure "REP_INVENTORY" for reporting purpose as below:

Then I go to Report Administration application and from more actions, I select "Set Report Object Structure Security". Provide access to MAXADMIN security group for the above object structure as below:

Now, in the Inventory application say you have created a query to display the inventory records of the logged in user, "Inventory of User Storeroom". If you want to set up a new result set in some existing start center, when you select to edit the portlet, you will be able to select the application, query and the object structure created above. And, you will be able to see the child table(s) along with the parent table under Object List.

When you select the attributes from the child table, you can see the <RELATIONSHIPNAME>.<ATTRIBUTENAME> in selected fields.

Once you save and finish the result set portlet setup, you will be able to see the resultset as below:
Recently I read an interesting blog about one more power packed feature of using this dot notation. I could not resist myself in trying that out and yes, it is worth mentioning about. You can use this relationshipname.attributename in cross-over domain's source and destination fields. Let us consider an example. We create a custom attribute in TICKET object, which is say, CUSTAPPROVER. In this field in Service Requests application, we need to display the supervisor of the supervisor of the affected person. So, we create a cross over domain as per the image below, which we associate with the CUSTAPPROVER attribute in TICKET object.

Hope you like reading this blog and your suggestions/comments are most welcome.

References:

Monday, 8 January 2018

Exploring Automation Scripts with some examples


Lets explore some of the solutions achieved through automation scripts in Maximo. If one has worked with customization or extension of Java classes in Maximo framework, he/she would be well versed with these solutions. But here we will follow the idea of achieving these solutions without having to think of building the ear file and deploying it into the web server. These solutions may not be agreed upon by every one but this is to show how automation scripts can be helpful in achieving the requirements. And, to highlight that automation scripts can be used in place of Java class files to achieve the functionality in similar fashion at the cost of no extension to the existing ear file. The contents used in this blog are examples only. Hope you like reading my blog. Suggestions / comments are most welcome.

Trade-off for using Automation Script over Cross Over Domains with YORN fields

You add a cross-over domain to an attribute when you want to copy one or more attribute(s) values from a related object to current object's attributes. For example, when you select an item in a Purchase Order Line record, you want to cross over the item's description, issue unit, order unit, etc. from Item Master record, cross-over domain can be an effective tool. Now, think about this. I have this requirement to copy the Storeroom and Storeroom Site from the logged in user's profile to a PO record when user checks the internal checkbox. Ideally, we would suggest cross-over domain to be used with PO.INTERNAL attribute. But, is it really this simple? We go ahead to create a cross-over domain to copy MAXUSER.DEFSITE and MAXUSER.DEFSTOREROOM (source fields) to PO.SITEID and PO.STORELOC (destination fields). 

When we try to associate this cross over domain to PO.INTERNAL attribute in Database Configurations application, we get the error: BMXAA0664E - Domain must be null for data type YORN. This is but obvious. So, other option left for us to explore is using the automation script. We can easily create an automation script on object "PO" with an attribute launch point on attribute 'INTERNAL" to achieve our desired solution.


Triggering the automation script - Which Launch Point to use?

I would  like to explain this using an example. We had a requirement that for a Kit item, we had to store the values of its sub-assemblies in one attribute. We identified the long description to capture this for a kit item. Next question is when to trigger this solution, when we identify an item to be a Kit item or when we save it. In Item Master application, we identify Kit items with checking of the "Kit?" checkbox and the "Item Assembly Structure" tab lists out the children this item has. We can make use of these out-of-the box attribute (ISKIT) and object ITEMSTRUCT to arrive at the solution. But generally, as and when we check the checkbox, "Kit?", for an item, Item Assembly structure is not available at that point of time. So, if we create an automation script with attribute launch point on attribute ITEM.ISKIT, it will not serve our purpose. Moreover, we need to associate the item assembly structure of this kit item to its children items/assets. Let us assume there is a custom relationship "CHILDITEMS", on parent=ITEM, child=ITEMSTRUCT with where clause as "itemsetid=:itemsetid and parent=:itemnum". we can use this relationship to fetch the children for the kit item.
We created an automation script with object launch point on object=ITEM as below:


And, we can use the following code snippet:


Automation Script for Calculations

Another example which I want to share involves some calculations. We need to store the Turns Ratio for items in Storerooms, which is calculated as net issues divided by average inventory for last 52 weeks. Net Issues is the number of issues minus returns from the inventory in last 52 weeks. And, avergare inventory was calculated by multiplying the sum of inventory balance of each week in last 52 weeks with average cost of inventory and then dividing this number by 52.

For this solution, we created a custom table WEEKLYBAL and had implemented a batch job (you can use escalation or a cron task), running every Saturday at a fixed time to copy the current balance of each inventory item (storeroom, item number, item set, system date as WEEKDATE, current balance as CURWEEKBAL and average cost), assuming ISO week starting on Sunday and ending on a Saturday. We also created a custom attribute, "INVENTORY.TURNRATIO", to store the value of all our calculations for each Inventory record. And, one more escalation can be created every Sunday after midnight in early hours of the day to trigger one action which in turn can be an automation script to do the following.
If you want to calculate the net issues for each inventory item using a SQL query, it would be as below:
select A.itemnum, A.storeloc, A.siteid, abs(sum(A.numofissues) - sum(A.numofreturns)) NetIssues  from
(select itemnum, itemsetid, storeloc, siteid,
case when issuetype='ISSUE' then actualcost 0 end as numofissues,
case when issuetype='RETURN' then actualcost else 0 end as numofreturns from matusetrans
where transdate between (trunc(sysdate,'IW')- 51*7) and (trunc(SYSDATE, 'IW')+6))A
group by A.itemnum, A.itemsetid, A.storeloc, A.siteid;
For this above part, we can create a relationship from INVENTORY object to MATUSETRANS object. Let us assume there is a relationship "ISSUERETURN52WK", parent=INVENTORY, child=MATUSETRANS with where clause as "itemnum=:itemnum and itemsetid=:itemsetid and siteid=:siteid and storeloc=:location and (transdate between (trunc(sysdate,'IW')- 51*7) and (trunc(SYSDATE, 'IW')+6))". Code snippet to calculate the net issues for all inventory items would likely be as below:

And, the average inventory for each inventory item will be calculated using the below query from the custom table "WEEKLYBAL":
select itemnum, itemsetid, storeroom, siteid, sum(curweekbal*avgcost)/52 from WEEKLYBAL 
where (weekdate between (trunc(sysdate,'IW')- 51*7) and (trunc(SYSDATE, 'IW')+6))
and trunc(weekdate, 'IW')+5 = trunc(weekdate)
group by itemnum, itemsetid, storeroom, siteid;

To simplify this, we have a new relationship "INVWKBAL52" for parent=INVENTORY and CHILD=WEEKLYBAL with where clause as "storeroom=:location and siteid=:siteid and itemnum=:itemnum and itemsetid=:itemsetid and (weekdate between (trunc(sysdate,'IW')- 51*7) and (trunc(SYSDATE, 'IW')+6)) and trunc(weekdate, 'IW') + 5=trunc(weekdate)". Turn ratio can be calcuated and stored in the custom attribute using an extension to the above snippet as below:

Wednesday, 22 November 2017

Using Interface Tables to Insert Records - Continuous Vs Sequential Queue

In our world, we come across different requirements and problem statements for which we need to provide solution. It is not necessary that each solution we design or implement would be agreed upon universally. We had this requirement to generate records automatically for one of the application in MAXIMO. At the same time, record needs to be created in the parent object as well as records need to be entered to its child object. So, definitely we need to think about Object Structure, Enterprise services, External Systems and off course Interface Tables to insert records to our MAXIMO main objects.

For this data import to MAXIMO through interface tables, we need to consider or keep in mind the following:
  1. Object Structure - The object structure with the required objects and parent-child relationships should be created. Exclude/Include fields should be used appropriately keeping in mind what columns need to be included in the interface table.
  2. Enterprise Service - Enterprise Service should be created with the above created object structure and the intended name of the Interface Table mentioned. You can check to enable message tracking.
  3. External System - You can create a new external system or use an existing one but ensure that end point selected is "MXIFACETABLE", sequential queues and continuous queues properly configured. 
    • Outbound Sequential Queue = jms/maximo/int/queues/sqout
    • Inbound Sequential Queue = jms/maximo/int/queues/sqin
    • Inbound Continuous Queue = jms/maximo/int/queues/cqin
    • In the Enterprise Services tab for this external system, add the above created enterprise service, check the "Enabled?" check box, check or uncheck the "Use Continuous Queue?" checkbox.
    • From action menu, now select the Create Interface Tables action. In the dialog, select the interface table name mentioned with the enterprise service and click on Create button. It will take a few seconds to process your request.
  4. Cron Task - In Cron Task Setup application, open "JMSQSEQCONSUMER" cron task and ensure that two cron task instances, one for sequential In and one for sequential Out are active. Next, open the "IFACETABLECONSUMER" cron task. A cron task instance should be present which is active with its scheduled defined. The properties for this cron task instance should have QUEUETABLE=MXIN_INTER_TRANS and END POINT=MXIFACETABLE.
  5. Writing data to Interface Table - At this stage, everything on the Maximo side has been set up, and we need to do to create some kind of routine to send data to the interface tables. The cron task IFACETABLECONSUMER, then polls the inbound interface queue table for new records to process as per the schedule set. 
    • Automation Script: For every record that needs to be added to the MAXIMO object, we need to add a new row to MXIN_INTER_TRANS object as well as to the Interface Table. For our convenience, we have used an automation script to include insert scripts for MXIN_INTER_TRANS and the interface table created above.
    • Cron Task: To trigger or initiate the above automation script, we have set up a new cron task with class=com.ibm.tivoli.maximo.script.ScriptCrontask. A new cron task instance also needs to be created with "Active?" checkbox checked and appropriate schedule defined. The properties for this cron task instance include SCRIPTARG=0 and SCRIPTNAME=<above automation script name>
With above configurations, we were able to create new records for the application, as stated above. Now, moving over to the confusion over using continuous queue or sequential queue for this approach. We had initially used continuous queue for this inbound processing of records to MAXIMO objects. If an incoming message gets stuck in sequential queue, other subsequent incoming messages are not processed until the error message is either reprocessed or deleted. To avoid this, we had gone ahead with continuous queue. It was working fine in our development instance. When this was moved to TEST and Production instance, we started facing an error of Database Error 1 in some of the incoming messages. 

I need to mention here that this database error 1 had come for primary key attribute of the main object in the object structure.We checked the logic in automation script to see if we were trying to insert any duplicate value to this attribute. This may have been due to continuous queue trying to insert two records with same ID generated. If we would reprocess the message with status=ERROR, it eventually gets processed. To handle this, we tried two approaches.
  1. We tried with increasing the Max Try Count, this issue got reduced but it was not fully resolved, i.e., the number of failed messages decreased but issue was still prevalent for a few messages. 
  2. We changed the inbound processing queue to sequential. We have never come across the database error 1 for our primary key attribute again and it has been seven to eight months since :) 
With the above experience, we can conclude that if the order of processing is important, like in our case above, we should use Sequential Queue rather than Continuous queue. Continuous inbound processing works better for transaction records like invoices, etc. Please do share your experiences and thoughts.


Saturday, 22 April 2017

Exploring Automation Scripts and their migration

We have already explored Automation Scripts in Maximo 7.5 and 7.6 to customize as per our requirements from Object, Attribute and Action launch point. Needless to say, automation scripts have made life easier not in one but in many ways for developers. There are many bloggers who have jotted down their thoughts around using action automation script. You can refer the blogs listed below to know about how automation script can be used to control an action from a push-button. And these work perfectly as an action called from any escalation as well.

  1. Action Automation Script
  2. Automation Script to control its action from a pushbutton
We do have Attribute Launch Points which have made it easier to address field level validations as well. Whenever a value is specified for that field, it may be a change of value as well, this attribute launch point which is associated with the field gets eecuted. Automation Scripts have given us the flexibility to bind our desired IN/OUT/INOUT variables from the launch points to values to/from object attributes.

Let us consider below two examples for Attribute Launch points:
1. Say, we want to clear a value in one of the field 'ATTR2' based on the value of some other field 'ATTR1' of object, say, 'TAB1'

  • I will create an attribute launch point on Object=TAB1 and Attribute=ATTR1
  • I will keep the launch point even as run action.
  • Let us keep the script language=Jython and log level=ERROR.
  • I am not going to create any variable and in the automation script, I will write the following code snippet:

strAttr1 = mbo.getString("ATTR1")
if (strAttr1=='XYZ'):
mbo.getMboValue("ATTR2").setValueNull(2L)
                PS: I have used setValueNull(2L) because there is a data restriction on the field ATTR2.
2. Next say, we want to set the count frequency when we add/update the value of ABCType in an inventory record-

  • I will create the attribute launch point on Object=Inventory and Attribute=ABCTYPE.
  • I will keep the launch point event as run action.
  • I will keep the script language=Jython and log level=ERROR.
  • I will declare three INOUT variables var_AFreq, var_BFreq and var_CFreq, with binding type=MAXVAR (value source from a MAXVAR). As soon as I select MAXVAR in binding type. Global Binding Value becomes required. We can select ABC Breakpoint-cycle count frequency and associate A_CCF, B_CCF, C_CCF, respectively. We can also copy the value in Launch Point Biding Value field also.
  • I will declare one IN type variable, var_ABCType with binding type=ATTRIBUTE (value sourced from an attribute) and launch point attribute as ABCTYPE
  • I will declare one more variable of type=OUT, var_CCF with binding type=ATTRIBUTE and launch point attribute=CCF
  • In the automation script, following code snippet, I need to write:

        if var_ABCtype=='A':
            var_CCF=var_AFreq
        if var_ABCtype=='B':
var_CCF=var_BFreq
                    if var_ABCtype=='C':
                       var_CCF=var_CFreq


 Now, let us talk about migration of automation script with an Attribute launch point. Whenever we are migrating an automation script and attribute launch point which has an event other than validate say, Initialize Value or Run action, in the source environment, we found that on the target environment, the event for the attribute launch point is selected as Validate.
While creating the package in the source environment, we had selected OOB migration group SCRIPTCFG in the package definition. We had kept the script names in the where clause for migration object DMSCRIPT ad launch point names in the where clause for migration object DMLAUNCHPOINT as below

  •      autoscript in ('script1', 'script2'...)
  •      launchpointname in (launchpoint1', 'launchpoint2'...)


EVENTTYPE attribute in object SCRIPTLAUNCHPOINT is non-persistent but for different event types of Attribute launch point type records, OBJECTEVENT saves a different value in database table. For example,

  • for attribute launch point type records with event Validate, objectevent=0, 
  • for attribute launch point type records with event Run action, objectevent=1,
  • for attribute launch point type records with event Initialize Value, objectevent=2, etc.

So, if we keep the where clause for migration object DMLAUNCHPOINT as below, it might solve the above issue.

  • (launchpointname='launchpoint1' and objectevent=2) or (launchpointname='launchpoint2' and objectevent=1) or .....

This is not tried and tested, however, would like to know your suggestions/thoughts around this. 

Friday, 7 October 2016

Maximo Applications - Exploring Conditional UI to Using Data/Attribute Restrictions

I have come across such questions many a time as why do we use data/attribute restrictions instead of using conditional UI with our application designer restrictions. There are pros and cons of using both in our practice, and there is no wrong or right away of doing things, also different people will have different thoughts based on their experience. And, I am  also writing this blog as per my experience or understanding.

As you all are aware that there are separate ways that can be used to set up condition UI in Maximo. Condition UI gives flexibility to change properties, give access or restrict data based on meeting or not meeting some condition. A developer also has the option to add and associate security options to tabs, sections, textboxes, tables etc., with a condition on top of the application security.

Let us start our explanation with a simple example. Let us suppose that my application has a text box, Status, which should be visible only to Management Group, Contractor Group, Labor group and HR group. I would go to application designer, create and associate a signature option to this text box. I would next go to Security Groups application, search for required groups, would navigate to Application tab and for my application I would give grant access to that signature option. I hope everybody would agree with me till this point. 

Next, let us add some restriction(s) to the Status field, gradually. For HR group, the field should always be read-only. What could be a better approach to achieve this? I can go to application designer to access the application, open the text box properties dialog for that field where the signature option, created above, is already associated and click on Configure Conditional Properties. Select the HR group in Security Groups section, associate a condition which is always true (like 1=1) and for true condition enter a property=inputmode and value=readonly. As per my understanding, better way would have been to use a attribute restriction in the security groups application. In the Security Groups application, search for HR group, navigate to Data Restrictions tab, open Attribute Restrictions sub-tab. Select the object, attribute, application and keep the Type=READONLY.

Since this data restriction is enforced at the data level, this restriction will work for all instances of the object/attribute regardless of being instantiated through presentation (application UI), or via background process (such as action, or via integration). We need to remember that data restrictions always supersede application configurations in the Application Designer application. The flow of restrictions on an attribute starts with database configuration, then data restriction which is enforced at a security group level, and then Application Designer configurations which is only at the application's UI presentation level.

We also need to remember that configurations that are created through data restrictions are applicable wherever that object-attribute pair is used, while application designer restrictions are not. If you want to apply a restriction to a field in all the tabs of an application, it is advisable to use data restrictions as all the fields in all the tabs will inherit the restriction. However, if you configure restriction in application designer, it will have to be configured in each field of each tab. Similarly, for a table column, for header and detail section you will need to configure the same restriction twice in application designer.

Now, let us add some more interesting things to our Status field. Let us assume there is also a lookup for Status field with values, Inspected, Routed, Checked, Routed to Manager, In Progress, Approved, Completed. For Contractor and Labor group, the Status field should be required based on the value of some other field. Let us suppose that if the description field is not null and contains 'Test', the Status field should become required for Contractor and Labor group(s). But the Status field lookup should display only 'Inspected' and 'Routed' values to a contractor and only 'Checked' and 'Routed to Manager' values to a labor group member. Also, a labor group member should see all other values in the lookup if  description field does not contain 'Test' but for a contractor group member no only two values should appear in the lookup at any time. We need not go explore conditional domains yet, let us save it for another day :)

Step 1: Create a condition TESTCOND in Conditional Expression Manager to check for value in description field of the same object.
Go to Security Groups application, search for Contractor group, navigate to Data Restrictions tab, open Attribute Restrictions sub-tab. Select the object, attribute, application, select the Type=REQUIRED and select Condition=TESTCOND.  Repeat the same step for Labor group.

Step 2: Create two new lookups (CONTLOOKUP and LABLOOKUP) in Lookups.xml to display Inspected and Routed values and Checked and Routed to Manager values, respectively.
Go to Application Designer application, search for the application. Open text properties dialog for Status field where the signature option, created above, is already associated and click on Configure Conditional Properties. Select the Contractor group in Security Groups section, associate a condition which is always true (like 1=1) and for true condition enter a property=lookup and value=CONTLOOKUP. Similarly, add Labor group in Security Groups section, associate TESTCOND in Conditions section, for true condition enter a property=lookup and value=LABLOOKUP and for false condition enter a property=lookup and value=VALUELIST (if there is ALN/SYNONYM domain associated with STATUS attribute in database configurations).

I am not sure whether everyone would agree with me for the above approach I have considered. Let us consider another aspect of granting access to signature options. We had configured conditional UI for a section to become read-only on meeting some condition for say, Labor Group. But this section needs to be visible to Management Group and HR Group but this section need not be available to Contractor group at all. As you all have figured out already, we have associated a signature option to this section and configured conditional properties for Labor group with a condition and have set property=inputmode and value=readonly for when condition is true. And, in Security Groups application, for this application and this signature option, we granted access to Management Group and HR Group but did not grant access to Contractor Group.

Here I usually need to answer very often why do we need to go to each security group to grant access? We can configure conditional UI for rest of the groups as well. For Management and HR Group(s) who already have this application access, we can also configure conditional properties for the section mentioned above by associating a always true condition with property=display and value=true. For contractor group, we can configure conditional properties for this section by associating a always true condition with property=display and value=false.

We do get into some more confusions with independence or dependence of security groups. There is very useful (or rather sometimes confusing) check box provided in Security Groups application as 'Independent of Other Groups'. We will keep multi-site implementations for some other time, we will focus on single-site implementations for today. The purpose of this particular checkbox is to decide whether access rights of this group can be merged with the access rights of other groups. This is very useful and applicable to multi-site implementations and does not hold much significance for single site implementations.

Let us consider a single site (SITE-A) implementation where a user belongs to two security groups, say Management and HR. Management group has access to Purchase Orders application and HR group has access to People application. Let us also consider that Management Group is set up with No Site information and HR Group is set up with SITE-A in a single site implementation. If we make both the sites independent then this user will have access only to People application. If we do not check 'Independent of Other Groups' checkbox for these two groups, the user will have access to both the applications. As a best practice, we should not check this checkbox for single site implementations.

If we have multiple independent security groups then the resulting security profile of the user gets difficult to determine if the user belongs to more than one security group. Let us extend our example further. Say user USER1 belongs to both HR and Contractor group(s). HR and Contractor groups are both independent and are implemented with SITE-A (or authorized for all sites). Both groups are implemented with access to Purchase Contracts application but have been configured with specific conditional access to change status. Say, contractor should be able to change the status of a purchase contract record on meeting condition X and HR should be able to change the status of a purchase contract record on meeting condition Y. If either of the condition X or Y is true, USER1 user will be able to change status of the purchase contract. If there is some user USER2 who belongs to Contractor group alone and user USER3 who belongs to HR group alone, then USER 2 will be able to change the status of a purchase contract record when condition X is true and USER3 will be able to change the status when condition Y is met.

If we clear the checkbox and make the contractor group dependent, what will happen to the privileges for USER1? In this case, USER1 will be able to change the status of Purchase Contract record when condition X is true.

Please feel free to post your views and comments on this blog. I would love to hear from you.


Thursday, 2 June 2016

Configuring Work Logs for an application

We all are aware that our world is a client driven world. We need to get workarounds for most of the requirements we gather. We came across one such requirement to configure work logs for Invoice application. So, we added relationships from INVOICE object to WORKLOG object as recordkey=:invoicenum and class='INVOICE'. We included the work log tab in our application xml. When we decompiled the WORKLOG.class in psdi.app.ticket folder in MAXIMO 7.6, we could see it includes PO and PR with earlier TICKET and WORKORDER class records only. So. while you want to add a record to WORKLOG from Invoice application, system is unable to decipher what is the parent class, what to set in recordkey field, etc.

We explored two approaches to get a work around to the above stated problem. One is to insert records into APPFIELDDEFAULTS table using below sql insert scripts


Next approach which is also very effective is using automation script. We created an object launch point on WORKLOG object with event as Initialization and wrote our source code as attached in the images below:


So far so good. We had another requirement to add similar tab to Item Master application. We had configured every thing accordingly but on click of New Row button in the Work Logs tab, we encountered the below error:


We found out that ITEM object is at ITEMSET level and does not have ORGID attribute, so we were thrown this particular error from the system. So, we rolled back all configuration changes we had done to add the Work Logs tab in Item Master application as any other application with Logs tab. We could not find a solution. As a work around, we created a custom object which had all the attributes as WORKLOG object, created a new relationship from ITEM object to this custom object and managed to add records to this new custom object. If someone had encountered such a scenario and were able to find a better solution, please feel free to share your thoughts.

References:

Wednesday, 28 October 2015

Payment Schedule Creation in Contracts and Invoices for the Purchase Order

There is a new feature introduced from Maximo 7.5 which allows users to schedule payments. You can use the Contract Line Items tab in the Contracts application to create a schedule of payments for the contract line items. I am going to present some scenarios where this feature can be useful and how the invoice is created for the same.

Points of Consideration and Scenarios for Payment Schedule functionality:

  1. Payment Schedule can be created for each contract line.
  2. Before you can create a payment schedule, you must select the Payment Schedule check box on the Properties tab.
  3. Out of the box payment schedule can be used to create Invoice on PO Approval and Receipt of Materials:
    • Payment Percent should be selected such that line cost of each milestone do not exceed total line cost.
    • For Example: A contract line has total line cost as 1000,
      • Payment % for action POAPPR= 10, line cost=10% of 1000=100
      • Payment % for action RECEIPT=90, line cost=90% of 1000=900
  4. Scenario 1: Contract Line with Qty=10, Unit Cost=100, Line Cost=1000,
      • Payment Schedule 1: Action=POAPPR, Payment Percent=10, Line Cost=100
      • Payment Schedule 2: Action=RECEIPT, Payment Percent=90, Line Cost=900
    • On PO approval, one invoice is created as: Invoice Qty=Ordered Qty=10, Unit Cost=10% of 100=10, Invoice Line Cost=100
    • On partial receipt of 6 items, one invoice is created as: Invoice Qty=90% of Received Qty=90% of 6=5.4, Unit Cost=100, Invoice Line Cost=540
    • On receipt of remaining 4 items, one invoice is created as: Invoice Qty=90% of Received Qty=90% of 4=3.6, Unit Cost=100, Invoice Line Cost=360
  5. Scenario 2: Contract Line with Qty=10, Unit Cost=50, Line Cost=500
      • Payment Schedule 1: Action=RECEIPT, Payment Percent=100, Line Cost=500
    • On Partial Receipt of 5 items, one invoice is created as: Invoice Qty=100% of Received Qty=100% of 5=5, Unit Cost=50, Invoice Line Cost=250
    • On Partial receipt of 3 more items, one invoice is created as: Invoice Qty=100% of Received Qty=100% of 3=3, Unit Cost=50, Invoice Line Cost=150
    • On receipt of remaining 2 items, one invoice is created as: Invoice Qty=100% of Received Qty=100% of 2=2, Unit Cost=50, Invoice Line Cost=100
  6. Scenario 3: Contract Line with Qty=10, Unit Cost=100, Line Cost=1000
      • Payment Schedule 1: Action=RECEIPT, Payment Percent=20, Line Cost=200, Days Interval=7
      • Payment Schedule 2: Action=RECEIPT, Payment Percent=80, Line Cost=800, Days Interval=7
    • On partial receipt of 5 items, two invoices are created as:
      • Invoice Date=7 days after receipt, Invoice qty=20% of Received Qty=20% of 5=1, Unit Cost=100, Invoice Line Cost=100
      • Invoice Date=30 days after receipt, Invoice qty=80% of Received Qty=80% of 5=4, Unit Cost=100, Invoice Line Cost=400
    • On partial receipt of 2 more items, two invoices are created as:
      • Invoice Date=7 days after receipt, Invoice qty=20% of Received Qty=20% of 2=0.4, Unit Cost=100, Invoice Line Cost=40
      • Invoice Date=30 days after receipt, Invoice qty=80% of Received Qty=80% of 2=1.6, Unit Cost=100, Invoice Line Cost=160
    • On receipt of remaining 3 items, two invoices are created as:
      • Invoice Date=7 days after receipt, Invoice qty=20% of Received Qty=20% of 3=0.6, Unit Cost=100, Invoice Line Cost=60
      • Invoice Date=30 days after receipt, Invoice qty=80% of Received Qty=80% of 3=2.4, Unit Cost=100, Invoice Line Cost=240

Example for Scenario 1

  1. Created one Purchase Contract with one contract line with payment schedule as below:
    • OrderQty=10, Unit Cost=100, Line Cost=1000
    • Payment%=10, Action=POAPPR, Line Cost=100
    • Payment%=90, Action=RECEIPT, Line Cost=900 
  2. PO created for the above contract and approved as below: 


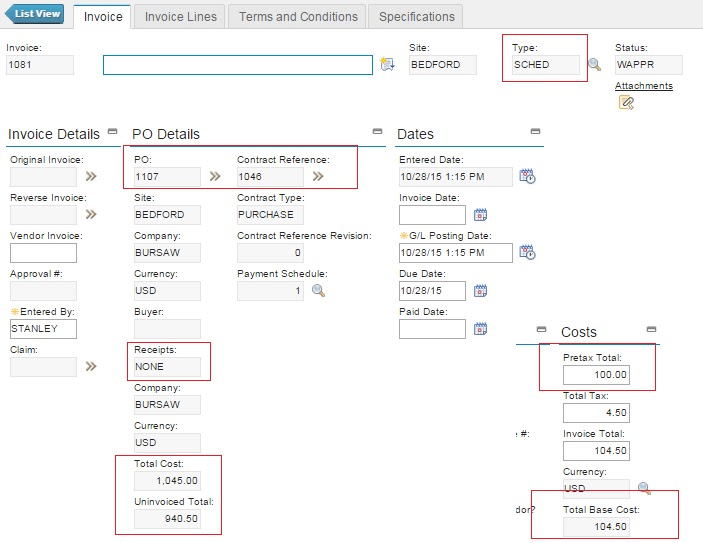
  3. On PO approval, an invoice is created as below with Pretax Total = 10% of 1000 = 100 USD:
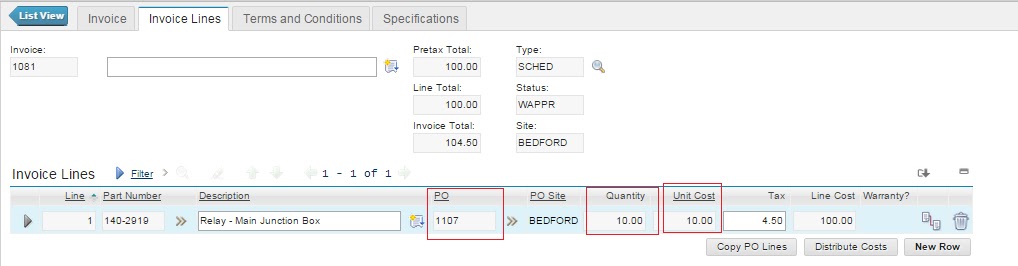
                                            Check the values in Total Cost and Uninvoiced Total fields. Also, check the Invoice Line details as below: Qty=10, Unit Cost=10% of OrderQty=10, Invoice Line Cost=100
  4. Receiving 6 items out of 10 ordered for Partial Receipt as below
                                                           
  5. One invoice is created for the above partial receipt as below: 
    Uninvoiced Total = 376.20                                           Check the Invoice Line details as: Unit Cost=100, Invoice Qty = 90% of Received Qty =    (90x6)/100 = 5.4, Line Cost = 540
  6. Receiving 2 more items as below: 
  7. Invoice created for above receipt as below: 

                                         Check the Invoice Line details as: Unit Cost=100, Invoice Qty = 90% of Received Qty =    (90x2)/100 = 1.8, Line Cost = 180.
  8. Receiving remaining 2 items as below: 
  9. Invoice Created for above receipt as below: 
                                                  Note that Receipt is now Complete and Uninvoiced Total=0. 
                                                   Also, check Invoice Line details as:  Unit Cost=100, Invoice Qty = 90% of Received Qty =    (90x2)/100 = 1.8, Line Cost = 180.
I hope this blog will help people in understanding how this feature works. Please feel free to share your comments.