Showing posts with label Automation Scripts. Show all posts

Tuesday, 4 September 2018

Random Examples of Maximo Automation Scripts

So far I have blogged about various capabilities offered by automation scripts in Maximo 7.6, needless to say I love working with Automation Scripts. I would like to share some random examples and usage of automation scripts in this blog. Please put your comments or suggestions.

Calling a Stored Procedure from Automation Script

I have a stored procedure in the database created as below:


This procedure needs to be executed on a scheduled basis. I can create a cron task or an escalation which will trigger the action. And, this action I can create as an automation script with Action launch point. The code snippet in this automation script will be as per the image below:

Throwing an exception in a Message Box using Automation Script

I have created a custom message in Database Configurations application which needs to be displayed to the user when the user selects a date less than the current system date while selecting required date in Create Requisition application. 

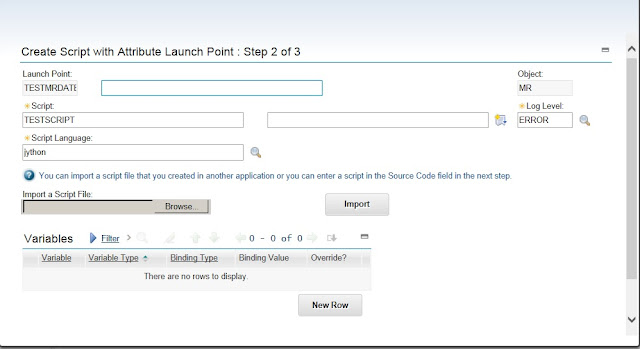
I will create an automation script of Attribute Launch point with validate event on MR.REQUIREDDATE attribute as per the images below:


Taking action from Yes/No button in Message Box using Automation Script

Let us consider we have to throw a warning message with Yes or No button, and the user can select either of them. Based on the choice of the user, we need to take separate actions. The warning message is created in the Database Configurations application as below:

My requirement is when I select the Issue Unit for an item record in Item Master application, if an order unit is available and issue unit and order unit are not same, user needs to be thrown warning message with a choice if he/she wants to proceed. In case the user selects yes, nothing needs to be done but if the user selects no, the value needs to be cleared from the Issue Unit field. I will create an automation script with Attribute Launch point on ITEM.ISSUEUNIT attribute and event Run Action, as per the images below:


Automation Script for Conditions

We can write automation scripts for custom conditions also which can then be used in workflows, or for achieving conditional UI, or in condition monitoring, etc. This type of automation script will be evaluated to either True or False and the boolean result is returned by the script using an implicit variable "evalresult".

Let us assume while approving a PO record, if the logged in user's PO approval limit is less than the total cost of the PO record, he should not be allowed to approve it. The automation script is created and source code is written as per below images.


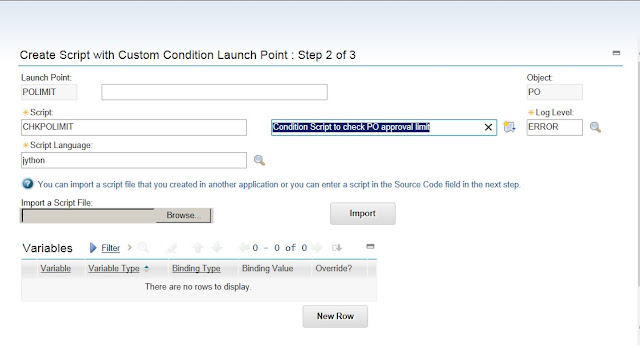


Once the script is written, we need to define the condition expression to refer this script. In Conditional Expression Manager application, create a new condition of type=CLASS and in the expression field, enter the notation as <script-name>:<launchpoint-name> and in the class field, enter the class reference as "com.ibm.tivoli.maximo.script.ScriptCustomCondition". See the image below.


Now, this condition 'CHECKLIMIT' is ready for use in the PO approval workflow process or in conditional UI to restrict the user in approving the PO record.

References:

Tuesday, 7 August 2018

Leveraging Automation Scripts for Inbound and Outbound processing of messages

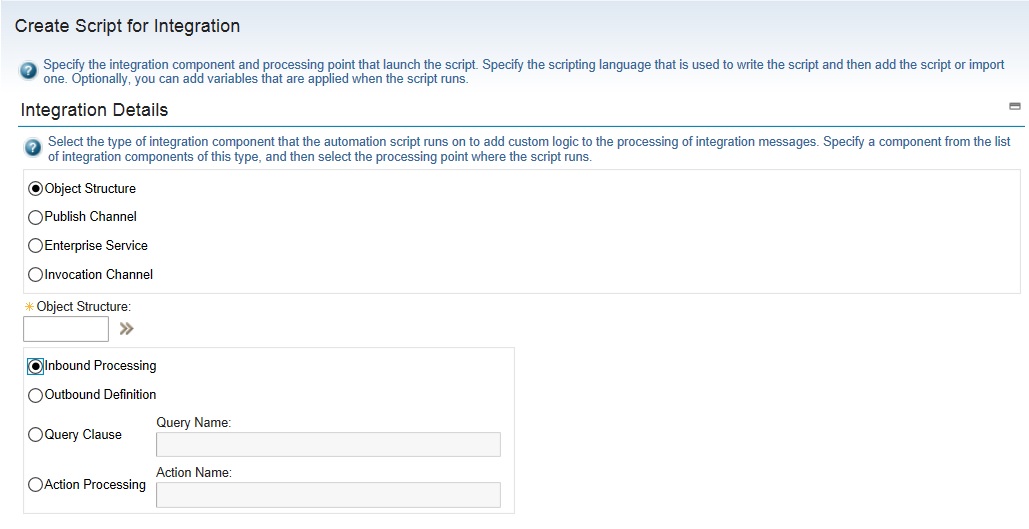
We have used java classes to extend the main java processing classes to customize the processing of integration messages for inbound and outbound transactions. Maximo 7.6 has given us the capability to leverage automation scripts to apply our custom logic to integration components. We can create automation script and associate it to an object structure, enterprise service, publish channel, etc. To create an automation script for integration, in the Automation Scripts application you need to select the action Create > Automation Script for Integration
Next, you will have to select the integration component on which the automation script will run to apply your custom logic. Before that we need to understand what are the different customization points for inbound and outbound transactions that are available with automation scripts.
  1. The automation script for outbound object structure allows an outbound definition to be created which will have the custom processing code to be used during serialization of business object data into an XML message. The automation script for inbound object structure allows an inbound processing of the incoming XML message before it is mapped to the business data. The automation script name will be created by the system as OSIN.<object-structure name> for inbound processing or as OSOUT.<object-structure name> for outbound processing. 
  2. Object structure processing creates the integration message which is then forwarded to the publish channel for outbound transaction. Custom logic can be written in an Automation scripts to process the publish channel further, through either External Exit, user exit before external exit, user exit after external exit or event filter processing. If the publish channel selected for the automation script is MXINVENTORYINTERFACE, then the script name will be as below:
    • PUBLISH.MXINVENTORYINTERFACE.EXTEXIT.OUT (External Exit)
    • PUBLISH.MXINVENTORYINTERFACE.USEREXIT.OUT.BEFORE (User Exit before external exit)
    • PUBLISH.MXINVENTORYINTERFACE.USEREXIT.OUT.AFTER (User Exit after external exit)

    • After successful creation of the automation script for the publish channel, in the Publish Channels application, you can see that predefined class references get auto-populated in Processing class, User Exit Class or Event Filter Class fields. The processing class field will have the value as "com.ibm.tivoli.maximo.script.ScriptExternalExit" if we have used external exit with the automation script or the user exit class field will have the value as "com.ibm.tivoli.maximo.script.ScriptUserExit" if we have used user exit class.

    • For outbound integration messages, Maximo will start an integration transaction. The object structure provides an internal record data (irData) element to a publish channel, which is then processed through a custom logic and an external record data (erData) element is constructed before the message is forwarded to its destination. We have created an automation script (PUBLISH.ES_MXITEMINTERFACE.EXTEXIT.OUT) with a publish channel that is created on MXITEM object structure. In this object structure, we have included a non-persistent attribute "ITEMNAME_NP" which should be combination of item number and description which needs to be sent in outbound transaction. The source code is as below:
  3. Enterprise service provides asynchronous and synchronous processing of inbound integration messages. During asynchronous processing, external service opens a connection and sends a  enterprise service request and does not require a response. However, during synchronous processing, external service opens the connection to send the enterprise service request and will maintain the connection till a response is received. Automation scripts provide the following customization points during the processing of inbound or outbound integration messages to be used with enterprise services:
    • Inbound Request - User Exit before external exit - SYNC.<enterprise-service name>.USEREXIT.IN.BEFORE
    • Inbound Request - User exit after external exit - SYNC.<enterprise-service name>.USEREXIT.IN.AFTER
    • Inbound Request - External Exit - SYNC.<enterprise-service name>.EXTEXIT.IN
    • Outbound Response - User Exit before external exit - SYNC.<enterprise-service name>.USEREXIT.OUT.BEFORE
    • Outbound Response - User exit after external exit - SYNC.<enterprise-service name>.USEREXIT.OUT.AFTER
    • Outbound Response - External Exit - SYNC.<enterprise-service name>.EXTEXIT.OUT

    • After successful creation of the automation script for enterprise service, you can see in the Enterprise Service application, for this enterprise service record predefined class references get populated as "com.ibm.tivoli.maximo.script.ScriptExternalExit" in the processing class field or as "com.ibm.tivoli.maximo.script.ScriptUserExit" in the user exit class field.

    • For inbound integration messages, external system starts the integration transaction and the incoming integration message provides an erData element to an enterprise service. Through a custom code, this element is processed to construct an irData element before the message is forwarded to the associated object structure. Let us assume that we are using out of the box enterprise service, 'MXPOInterface' to processes inbound messages to MXPO object structure. If for any incoming PO record, buyer (PURCHASEAGENT) is null, we need to use the value of the person who has initiated the PO record in this field before saving it to PO object. Automation script is created as per the image below:
After the above automation script is created, you can see in the related enterprise service record, processing class field is auto-populated with the predefined class reference. See the below image:

In case you want to delete the above script, please remember to remove the class reference explicitly from this field in the Enterprise Services Application.

References:

  1. Creating automation scripts for integration
  2. Automation Scripts with Object Structures
  3. Automation Scripts with Publish Channel
  4. Automation Scripts with Enterprise Service
  5. Examples from IBM Knowledge Center

Thursday, 26 July 2018

Dynamic values in Lookups - Automation Script Example

Let us consider field level validation of maximo business object attributes. When we are talking about field level validation class, we will directly jump to extend the MboValueAdapter class. Say, in service request records we have to set the value of Phone field of reported by, if it is null, with the value of Primary SMS field in the person record. We will write a java class in a custom package, custom.module.mbo.NewCustomFldClass, in its action method we will write the business logic. After building the ear file and deploying it, we will enter the class path in SR.REPORTEDBY attribute in Database Configurations application and then apply the configuration changes. Let us check the Java source code in the image below:


Whenever a value will be entered in the SR.REPORTEDBY field and tabbed out, above class file will do its action. This can be achieved alternatively by creating an automation script with Attribute launch point with Run Action event on SR.REPORTEDBY attribute, with a simple source code as below:


Now, what if we need some validation and action along with a lookup. We will write the new java custom class which will extend psdi.mbo.MaxTableDomain. We can use the init(), validate() and action() methods as per our requirement and in addition to these, we have one more action getList() for our use. In this custom class we can set the relationship to the object from which we want the values to be fetched and a list criteria with the where clause to filter data from that object. Inside the getList() method we can set additional where clause to filter data.

Conditional lookups for a field can also be achieved in Application Designer, for which I have explained with an example in another blog

Let us consider that when user clicks New Row in Materials sub-tab of Plans tab in Work Order Tracking application, Item field lookup should display all items available if it is a direct issue, else the lookup should display a set of values of items for which Inventory records exist in the default storeroom of the reported by user. To achieve this, following table domain is created as the first step:

Next, we want to create an automation script with Attribute Launch point and event Retrieve List. This is done as per below images:


The source code of this automation script is written as per below image:


References:

Monday, 23 July 2018

Fetching Mbo Sets using RelationShip or MXServer - Automation script Examples


I would like to draw your attention towards one important thing which we keep using in our java codes or Jython scripts but we do not use them properly. This is about getMboSet() method. As we are aware there are two ways of fetching an Mbo set, either by using a relationship or MXServer. Improper use of this may lead to performance issues, poor memory management, etc.

For example, I am working with save event of Object launch point on WORKODER object. I need to set a value in all related tasks which are in approved status. There is a relationship between WORKORDER object and WOACTIVITY object which can give me the set of all related tasks of the workorder which are in approved status. It will be easier for me to use this relationship to fetch the WOACTIVITY records. Please keep in mind that when I am accessing the Mbo records using a relationship, it is included in the same transaction as the parent Mbo Set and if I call a save on the parent Mbo Set, all MboSets in the current transaction will be saved. So, the Mbo sets fetched using relationship do not require save to be called explicitly because their save is called when their parent is saved.

In the above code snippet, I can also use a setWhere clause to specifically select some of the records, this new where clause will be appended with the existing where clause of the relationship and you will have to call a reset() method to execute and update the resultset obtained using the relationship. 


Above script will save the WORKORDER records and the related WOACTIVITY records in the current transaction.

Let us consider that the relationship from WORKORDER object to WOACTIVITY does not exist which may satisfy the search criteria we are looking for. In this case, we can create one on the fly as below: 


The parameter “$WOTASK” is a temporary relationship name, “WOACTIVITY” is the child object, and “parent=:wonum and siteid=:siteid and istask=1 and status=’APPR’ and targcompdate is not null” is the relationship where clause. The values of :wonum and :siteid will be taken from the current Mbo record from WORKORDER object.

While fetching MboSets from MXServer, we have to be careful about a few things.
  1. Always use setWhere() and reset() methods with this MboSet. The setWhere() method will reduce the number of Mbo records being fetched and reset() method will ensure fetching of data with the where clause.
  2. If the Mbo set is being fetched only for traversing and not for any addition or update, it is a best practice to set the DISCARDABLE flag as true. If the Mbo set is being fetched for read-only purpose it is a good practice to set the NOSAVE flag as true. These steps will shorten the looping time of the transaction.
  3. If any setValue method is used for some Mbo record of the MboSet, or any add or update is being done on the Mbo set, it is required to call the save() method on the set. Mbo sets fetched from MXServer needs to be saved before the set is closed otherwise the changes will be lost.
  4. Always use clear() and close() methods on the Mbo set fetched using MXServer if it is not required anymore. This will release memory and the database resources

Let us consider one example. Every Saturday, we need to run an escalation to update the actual cost of all issue transactions of active inventory records of all capitalized items that have happened between last Monday and Friday. We have written an escalation to run every Saturday on Inventory Object which calls an Action. Keeping in mind all the above rules, this action logic is written in an automation script with Action launch point, below is the sample source code of the script.


Thursday, 5 July 2018

Using Maximo Constants in SetValue methods of Automation Scripts - What, Where, Why

I am blogging again on automation scripts to share my learning with the readers and the contents used in this blog are examples only. Hope this blog helps someone and suggestions/comments are always welcome.  In Maximo 7.6, we have different launch points Object, Attribute and Action to associate to the automation scripts. We already know when to use what. Still, I want to emphasize a few points. 

We have seen in object level java classes order of execution of the methods. The initValue() method is the first method executed after the constructor and is used to initialize attributes on new records and to set default values. The init() method is called after initValue() to set the related attributes as read-only and save() method is executed at the end. Now, coming back to automation scripts, for object launch points we have the events as shown in the image below:

I have a requirement to set the Internal checkbox on PO record creation if the logged in user belongs to some security group X and user should not be able to edit this value. I can use an object launch point on object PO with Object Event Condition as ":&USERNAME& in (select userid from groupuser where groupname='X')" and event as "Initialize Value" and in the script source code I can simply use the below lines:


Let us consider another example where we want to populate the values of PO.SHIPTO and PO.SHIPTOATTN fields based on the PO.PURCHASEAGENT and its related person record. We can use an automation script with object launch point on object PO and event would be Save. On add or update of a PO record, this will be triggered on save. Please see the below images for this example.

Please note that PURCHASEAGENTPSNREC is a relationship name from parent PO object to child PERSON object with where clause "personid=:purchaseagent". Also, please note that while setting the values I have not used any Mbo Constant. I will come back to this later.

Let us now consider field level java classes. The field validation or action gets invoked when tabbing out of a field, or when a field is being set from the back end. The typical order of execution of methods in a field level class is: initValue(), init(), validate(), action(), hasList(), getList(). The initValue() method is used for initializing fields for new records, init() method sets read-only fields, validate() method can be used to verify whether the new value for the attribute is valid, and action() method can be customized to contain the business logic or update any other object or attribute. Similar thing we can keep in mind while using Attribute launch points. Please see the below image.
We can use Initialize Value event for an Attribute launch point to achieve same result as we use initValue() method in a field level java class, Initialize Access Restriction event can be used on the same lines as init() method, Validate event for validate() method, Run action event for action() method, and Retrieve List event will work in similar lines as getList() method. It is easy to correlate the order of execution of these events with the methods of field level java customization. For example, when we add a new line record in PO Lines tab and select an item, we need to make fields X and Y read only, copy a few fields from related item master record if it is a KIT item. We have to do all this when we enter or select the value in ITEMNUM field. We wrote the logic to make fields X and Y read-only in an automation script with Attribute launch point on POLINE.ITEMNUM attribute using event Run Action and used another automation script to copy the values from related item master record to POLINE fields with Attribute launch point on POLINE.ITEMNUM attribute using Validate event. 

Let me come back to MboConstants and draw your attention towards an error we got while we were changing the capitalized status of an item in Item Master application. We got an error as Inventory Object is read-only. When one item is changed to capitalized status, it tries to update all  the related inventory records and save on INVENTORY object is called which in turn calls save method on child objects, INVBALANCES, INVCOST, etc. We have configured some access restriction in the fields of INVENTORY object and one automation script was running to set a few fields of INVENTORY record. This automation script was written on Object launch point with Save event. To resolve this we had to use MboConstants.NOACCESSCHECK in the setValue method used in that script. This was to make sure that those fields can be overwritten without having to rely on whether the fields are accessible on Mbo level.

Similar to the above example, we had not used any Mbo Constant in the setValue methods in our object launch point script with Save event. In this case, however, it is not going to loop through an array of records. It is setting the values of the same PO record on which purchaseagent field is not null. So, even if we do not use MboConstants.NOACCESSCHECK with the setValue method it is not going to throw any error in Purchase Order application. It is recommended to use with the setValue method so as to ensure that the PO record is accessible at any point of time when save on PO object is called from another application or external event. So, the modified script should be as below:
And, it is also a good practice to close a MboSet if it is not to be used anymore.

You can refer the following sites if you want to know about what Maximo constants we need to use while setting values of attributes.
Using field flags to set attribute content
Flags for setValue methods
Mbo Constants in Maximo

Monday, 8 January 2018

Exploring Automation Scripts with some examples


Lets explore some of the solutions achieved through automation scripts in Maximo. If one has worked with customization or extension of Java classes in Maximo framework, he/she would be well versed with these solutions. But here we will follow the idea of achieving these solutions without having to think of building the ear file and deploying it into the web server. These solutions may not be agreed upon by every one but this is to show how automation scripts can be helpful in achieving the requirements. And, to highlight that automation scripts can be used in place of Java class files to achieve the functionality in similar fashion at the cost of no extension to the existing ear file. The contents used in this blog are examples only. Hope you like reading my blog. Suggestions / comments are most welcome.

Trade-off for using Automation Script over Cross Over Domains with YORN fields

You add a cross-over domain to an attribute when you want to copy one or more attribute(s) values from a related object to current object's attributes. For example, when you select an item in a Purchase Order Line record, you want to cross over the item's description, issue unit, order unit, etc. from Item Master record, cross-over domain can be an effective tool. Now, think about this. I have this requirement to copy the Storeroom and Storeroom Site from the logged in user's profile to a PO record when user checks the internal checkbox. Ideally, we would suggest cross-over domain to be used with PO.INTERNAL attribute. But, is it really this simple? We go ahead to create a cross-over domain to copy MAXUSER.DEFSITE and MAXUSER.DEFSTOREROOM (source fields) to PO.SITEID and PO.STORELOC (destination fields). 

When we try to associate this cross over domain to PO.INTERNAL attribute in Database Configurations application, we get the error: BMXAA0664E - Domain must be null for data type YORN. This is but obvious. So, other option left for us to explore is using the automation script. We can easily create an automation script on object "PO" with an attribute launch point on attribute 'INTERNAL" to achieve our desired solution.


Triggering the automation script - Which Launch Point to use?

I would  like to explain this using an example. We had a requirement that for a Kit item, we had to store the values of its sub-assemblies in one attribute. We identified the long description to capture this for a kit item. Next question is when to trigger this solution, when we identify an item to be a Kit item or when we save it. In Item Master application, we identify Kit items with checking of the "Kit?" checkbox and the "Item Assembly Structure" tab lists out the children this item has. We can make use of these out-of-the box attribute (ISKIT) and object ITEMSTRUCT to arrive at the solution. But generally, as and when we check the checkbox, "Kit?", for an item, Item Assembly structure is not available at that point of time. So, if we create an automation script with attribute launch point on attribute ITEM.ISKIT, it will not serve our purpose. Moreover, we need to associate the item assembly structure of this kit item to its children items/assets. Let us assume there is a custom relationship "CHILDITEMS", on parent=ITEM, child=ITEMSTRUCT with where clause as "itemsetid=:itemsetid and parent=:itemnum". we can use this relationship to fetch the children for the kit item.
We created an automation script with object launch point on object=ITEM as below:


And, we can use the following code snippet:


Automation Script for Calculations

Another example which I want to share involves some calculations. We need to store the Turns Ratio for items in Storerooms, which is calculated as net issues divided by average inventory for last 52 weeks. Net Issues is the number of issues minus returns from the inventory in last 52 weeks. And, avergare inventory was calculated by multiplying the sum of inventory balance of each week in last 52 weeks with average cost of inventory and then dividing this number by 52.

For this solution, we created a custom table WEEKLYBAL and had implemented a batch job (you can use escalation or a cron task), running every Saturday at a fixed time to copy the current balance of each inventory item (storeroom, item number, item set, system date as WEEKDATE, current balance as CURWEEKBAL and average cost), assuming ISO week starting on Sunday and ending on a Saturday. We also created a custom attribute, "INVENTORY.TURNRATIO", to store the value of all our calculations for each Inventory record. And, one more escalation can be created every Sunday after midnight in early hours of the day to trigger one action which in turn can be an automation script to do the following.
If you want to calculate the net issues for each inventory item using a SQL query, it would be as below:
select A.itemnum, A.storeloc, A.siteid, abs(sum(A.numofissues) - sum(A.numofreturns)) NetIssues  from
(select itemnum, itemsetid, storeloc, siteid,
case when issuetype='ISSUE' then actualcost 0 end as numofissues,
case when issuetype='RETURN' then actualcost else 0 end as numofreturns from matusetrans
where transdate between (trunc(sysdate,'IW')- 51*7) and (trunc(SYSDATE, 'IW')+6))A
group by A.itemnum, A.itemsetid, A.storeloc, A.siteid;
For this above part, we can create a relationship from INVENTORY object to MATUSETRANS object. Let us assume there is a relationship "ISSUERETURN52WK", parent=INVENTORY, child=MATUSETRANS with where clause as "itemnum=:itemnum and itemsetid=:itemsetid and siteid=:siteid and storeloc=:location and (transdate between (trunc(sysdate,'IW')- 51*7) and (trunc(SYSDATE, 'IW')+6))". Code snippet to calculate the net issues for all inventory items would likely be as below:

And, the average inventory for each inventory item will be calculated using the below query from the custom table "WEEKLYBAL":
select itemnum, itemsetid, storeroom, siteid, sum(curweekbal*avgcost)/52 from WEEKLYBAL 
where (weekdate between (trunc(sysdate,'IW')- 51*7) and (trunc(SYSDATE, 'IW')+6))
and trunc(weekdate, 'IW')+5 = trunc(weekdate)
group by itemnum, itemsetid, storeroom, siteid;

To simplify this, we have a new relationship "INVWKBAL52" for parent=INVENTORY and CHILD=WEEKLYBAL with where clause as "storeroom=:location and siteid=:siteid and itemnum=:itemnum and itemsetid=:itemsetid and (weekdate between (trunc(sysdate,'IW')- 51*7) and (trunc(SYSDATE, 'IW')+6)) and trunc(weekdate, 'IW') + 5=trunc(weekdate)". Turn ratio can be calcuated and stored in the custom attribute using an extension to the above snippet as below: