If you are interested to subscribe to my new course, please use the below URL link with my referral code.
Friday, 17 June 2022
Friday, 13 August 2021
Maximo - Architecture, Infrastructure, Implementation - A ready course l...
When you decide to subscribe to my course in Udemy.com, please use the below referral link.
Friday, 24 July 2020
Thursday, 16 April 2020
Monday, 6 April 2020
Friday, 3 April 2020
Exploring MBR Language scripting and REST APIs using JSON Format with examples
Maximo as a product is always
emerging and evolving in the space of enterprise asset management and the
recent versions of Maximo, like 7.6.1, is by far the most impressive version
available in the market. It delivers and caters to client and industry driven
needs. Availability of Maximo SaaS versions on cloud has exposed the developer
community to a more demanding and fastest growing segment where in he/she is
expected to explore out of his/her comfort zone of relying into Java
Customization or Automation Scripting for that purpose. Because Maximo SaaS public/standard version
is all changing the game plan for a developer. In this changing paradigm, a
developer is supposed to understand that MBR is the only scripting language
supported available in IBM Maximo EAM SaaS. Also, integration is supported
mostly through REST APIs in the Maximo Public SaaS variant. Through this
blog I want to throw some light on the same subjects with a few practical
examples.
Maximo Business Rules Scripting Language
The latest versions of Maximo on
cloud necessitate a Maximo developer to be familiar with MBR. This scripting
language provides cloud-safe way to extend application business logic and is
evolving gradually. The Maximo Business Rules scripts are text files that are
made up of expressions. These expressions contain operators, functions and
variables. Supported launch points that can be associated with MBR scripts are
for Maximo business objects, attributes, conditions and actions. These MBR
scripts cannot access Maximo framework’s Java classes directly. MBR scripts
allow you to create functions pre-fixing the function name with a “:”. You can
write library scripts for reusable code and these library scripts can be invoked
by any other script. You can add comments by pre-fixing with a “#”. But there
are certain rules around these. You cannot call a function or a library script
recursively from your script. You cannot define more than one expression in the
same line. No expression can span multiple lines. You cannot add inline
comments. MBR Scripts restrict looping capability to delimited strings known as
tokens and to MBOs that are related to the MBO that owns the current artifact.
Keeping all these in mind you have to write a script using MBR language. And,
you should also be aware that MBR scripting cannot be used to support
Integration in Maximo SaaS variants, at least not yet.
There is a list of mathematical
and Boolean operators, and the common mathematical, String manipulation,
Aggregation, Date Manipulation functions are available in MBR language. Control
flow functions like if(), break, continue, foreachmbo() are available for use.
Date manipulation functions like now(), date(), duration(), datetime() are for
your use. There are two very important functions to manipulate the variables in
the scripts, as getVar(var_name) to retrieve the value of a variable, and
setvar(var_name, expr) to set the value of a variable. There are a number of
Maximo business specific functions as invokescript(), newmbo(), setValue(),
error(), tobeadded(), tobeupdated(), scriptvar(), invokeworkflow(),
setvarresult(), setrequired(), etc. are also available. There are dollar notations
to access the MBO attributes in the MBR script. You can use a notation like
Relation1$Relation2$Relation3$...$RelationN$attr to traverse several
relationships to reach the MBO that contains the desired attribute value. A
complete list for all of these can be referred to in the pdf file available
from the below URL.
Let us jump into a few examples
to understand how easily you can adapt to this new language. For the very first
example, let us throw an error to the user when user selects the required date
less than the current system date in Create Requisition application. We will
create the error message in the Database Configurations application with
message group as “ErrMsgGrp”, key as “ErrMsgKey”, display method as MSGBOX and
the value of the error message as say, “Please select a date greater than the
current date.” So far so good. Next, we proceed to create an automation script
with Attribute launch point on object MR and attribute REQUIREDDATE with event
as Validate. We are still in our familiar conform zone. We select the script
language as MBR and the desired log level. Then we write the source code, and you
will be very happy to write a single line that will suffice our requirement.
Refer the image below for the source code.

You can see for yourself, it is
such a simple If statement; i.e., If(<condition expression>, <expression
if true>, <expression if false>). Now() is a date function that
returns the current system date and time.
For our next example, let us
explore how to make use of use variables and how to access a MBO attribute
value from a related object from the current MBO record. In Purchase Orders
application, on adding a line record, if the user selects an item number and
the selected item is of type KIT, a field, say ‘X’, need to become read only
else, another field, ‘Y’, needs to become required. For this requirement, we
will create an automation script with attribute launch point on object POLINE
and attribute ITEMNUM. Please refer the image below for its source code.

You can see the dollar notation
used here to fetch the value of ISKIT attribute from ITEM object using the
relationship name “ITEM” which exists between parent object POLINE to child
object ITEM. We are setting this value to a new variable “var_kititem” created
for this script. You can see the If statement. If this variable “var_kititem” is
true, attribute X is set as read only else attribute Y is made required. You
can add the comment line starting with hash.
Let us also explore how to loop through a MBO set in MBR scripts. Let’s assume we have to update the actual
cost of all issue transactions of active inventory records of all capitalized
items that have happened between last Monday and Friday. Any issue of an
inventory record in Maximo is written into MATUSETRANS object. Let us consider
that we create a relationship from MATUSETRANS object to INVENTORY object with
the name as “CAPITEMISSUES” and where clause as “siteid=:siteid and location=:storeloc and itemnum=:itemnum and itemsetid=:itemsetid and issuetype='ISSUE'
and exists(select 1 from ITEM where itemnum=:itemnum and itemsetid=:itemsetid and
CAPITALIZED) and (transdate betweek trunc(sysdate)-5and trunc(sysdate)-1)”. Then we proceed to create an automation script “CALCULATECOST” with
Action launch point in Object MATUSETRANS. We will then create an escalation on
MATUSETRANS object to call this action “CALCULATECOST” every Saturday. The
source code that is written using MBR language is as shown in the image below.

We have used foreachmbo() control
function here and we are calling a function “capitemcost” for each record
fetched from the relationship name “CAPITEMISSUES”. The function starts with
its definition with the “:” and it finds the LASTCOST attribute value from the
related INVCOST MBO record. This is fetched using the dollar notation for
related MBO sets, CAPITEMISSUES being the relationship from MATUSETRANS to INVENTORY
object and INVCOST being the relationship from INVENTORY to INVCOST. The
LASTCOST attribute’s value we are setting in a variable “v_costvalue”. You can
see that with the setvar function we have used a Boolean value TRUE. This is to
make this variable global so that this can be used by outside the function “capitemcost”.
ACTUALCOST attribute of the MATUSETRANS record by multiplying Quantity value to
the value of the variable “v_costvalue”.
Maximo REST APIs using JSON format
The multi-tenant or public
variant of Maximo SaaS, IBM Maximo EAM SaaS, provides integration support
mostly through REST APIs. It allows inbound integrations, outbound events and
data export by enabling a secure sharing of data between Maximo and external
applications. In this variant of Maximo SaaS, you are not allowed to create or
modify any Object Structure. You do not have support for integration scripting.
There is no support for XML messages and web services. Only JSON and CSV
formats are supported.
All these necessitate a developer
to understand how to use REST APIs with JSON formats. The REST (Representational
State Transfer) application programming interface (API) provides a way of
querying and updating the Maximo application data by external applications. The
REST API is part of the Maximo Integration Framework and can be used for CRUD
(Create, Read, Update, Delete) functions on the data using either XML or JSON
(JavaScript Object Notation) representation formats. In Maximo SaaS Public,
however, JSON is only supported with REST API. REST is based on the concept of resources
and hence, Maximo REST API exposes two types of resources, Maximo Business
Objects (mbo) and Integration Object Structures (os). You can see two system
properties for JSON format in Maximo which shows that Maximo REST API uses
serializer classes, “mxe.rest.serializer.mbo.json” and “mxe.rest.serializer.os.json”.
Using REST API is actually very simple. First of all, you should know what is the URL of Maximo REST services. It is usually http://[HOSTNAME:PORT]/maxrest/rest. Say, we want to retrieve the list of all person records whose last name starts with “LAN”, using the integration object structure MXPERSON. We will simply use the URL as below.
And, Maximo will perform a wildcard search so all person records that starts with the string LAN in the last name field will be returned. When you are using a REST API call with HTTP GET request like above, you may get an authentication error as “User name and password combination are not valid.” In such a case, the REST API call is expecting userid and password arguments with the HTTP GET request. So, we may use the below URL if we are using native authentication.
http://[HOSTNAME:PORT]/maxrest/rest/os/mxperson/?_lid=wilson&_lpwd=wilson&LASTNAME=LAN%.
Let us take another example to retrieve all the PO records sorted in descending
order of total cost value. You will use the below URL to do so.
Moving on from READ to CREATE or UPDATE functionality of CRUD, let us
make some REST API calls with the HTTP POST request. Say, I want to change the
description of an asset 1001 of BEDFORD site to New asset description. Here we are using an argument _action to
specify a Change and ‘%20’ is used to encode spaces.
Next I want to change the status of all internal PO records of BEDFORD.
Here the parameters with tilde prefix, status and memo, specify that these
parameters belong to a web method.
http://[HOSTNAME:PORT]/maxrest/rest/mbo/po/?_lid=wilson&_lpwd=wilson&siteid=BEDFORD&internal=1&~status=APPR&~memo=Status%20change%20from%20REST%APILet us create a new location ‘XYZ’ in BEDFORD site of storeroom type in OPERATING status. Note the use of argument _action with AddChange.
http://[HOSTNAME:PORT]/maxrest/rest/mbo/location/?_lid=wilson&_lpwd=wilson&_action=AddChange& location=XYZ&siteid=BEDFORD&type=STOREROOM&status=OPERATING&description=My%20location%20description
References
Monday, 1 July 2019
Maximo Asset Configuration Manager - Management of Inventory, Purchasing and Receiving of Assets
Since last six or seven months I
have been working in a project where we are supporting a client who are using Maximo
Asset Configuration Manager. While trying to understand the functionalities and
the applications around this Industry Solution add-on to standard Maximo Asset Management, I have gone through many PDFs and browsed through IBM websites. The references are cited at the end of this blog. I had
been struggling to find the materials in one place to try for a hands-on. I
have discussed with some of the folks who have been supporting this project
from a long time. A few of them could explain the How’s, then failed to answer
my Whys. Through this blog, I am trying to collectively put the topics in one
place about what is ACM and how to manage the configuration-managed items in
inventory and procure the assets. Please feel free to leave your comments, would love to hear your thoughts.
Introduction
Maximo Asset Configuration Manager is used to manage complex and regulated assets, like air crafts, rail vehicles, engines, etc. This follows a rules-based configuration management system. This industry solution add-on has introduced 10+ new applications in Maximo, a few CM versions of existing applications and added 50 new ‘PLUSA’ tables to Maximo database. Let’s not think about those as of now.Let us first understand what this Configuration Management Process is. This is the specification of allowable as-designed asset assemblies ("models") and/or as-maintained physical builds. This is also referred to as the process of ensuring that actual physical build of an asset meets the requirements of an allowable configuration. There are three main phases in Asset Life Cycle, ‘As Designed’, ‘As Built’ and ‘As Maintained’. Maximo ACM is used in ‘As Maintained’ phase. Maximo ACM uses information and data from the ‘as designed’ and ‘as built’ phases to compare assets in service against Design Standards.

Maximo Asset Configuration Manager (ACM) is
designed specifically to address the needs of organizations managing complex
assets within highly regulated, safety-critical and dynamic environments. It
uses information and data from
the ‘as designed’ and ‘as built’ phases as referenced data in Maximo to create and
maintain the operational data. Maximo ACM separates the referenced data and
operational data as shown in the image below.

The build data interpreter(BDI) is a
multi-threaded Java service which is independent from the main Maximo
enterprise application and can be installed and configured on the same physical
hardware as the Maximo application, the Maximo database server or on a separate
dedicated server. BDI provides comprehensive status derivation for
configuration-managed assets and reports the status of non-compliant assets. For
example, it checks an actual aircraft, position by position, to ensure that its
configuration rules comply with its nominated configuration.
Configuration Managed Assets and Items
Configuration Managed (CM) assets are different from other
product assets as they can be composed of other assets or components defined
within a hierarchy that have associated CM rules. Primary entity involved in CM
is a Model. Models are primarily used as templates to maintain the
‘As Maintained’ information. Models define assembly rules and the
hierarchical relationship of parts in an assembly but not the Spare parts.
The different components of a Model are as listed below:
- CM Items are the Inventory
Part Numbers available to use for a Build Item.
- Build Items – Represent
the building blocks to build a model and are a collection of CM items and
labels with the same description that can be associated with the model's
build position.
- Build Positions - are used
to create the model’s hierarchical relationship. Rules are applied to
build positions, like allowable CM Items, Mandatory positions, etc.
Configuration Managed item is a
part number that is under configuration management control, or in other words,
a part number with catalog number which is associated with the model that is
used to validate operational changes to an asset. Configuration-Managed Items
are automatically created when models are created. CM items can also be created
in CM Item Master application. CM Items can be managed in inventory and can be
issued to work orders, locations or assets.
Maximo ACM maintains a
cross-referenced catalog of item records for following purpose:
- Creation and management of system-generated items
that represent models and configuration of models.
- Creation of such items that are produced locally on a
temporary basis.
- Changing the part number of an item or adding a local
part to a catalog.
Now what is all this supposed to
mean? Let me simplify this by using an example and let us consider an example to define a model of
Car Chassis/body as in the image below.

Creation of CM Items and Models
Before creating a model, CM item
needs to be created. CM Item Master (CM) application can be used to create the
CM Items. Models are created in the Models
(CM) application. For creation of a model the first step is to create the build
items for use in the model. The second step is to identify the CM items for
each build item. Please see the below image for our example.

Next
step is to build the model hierarchy and the below image defines the model
hierarchy for our example.

Once a model is created and you have defined the model hierarchy and you need to activate two important model components, its variation and revision.
Creation of Configuration Managed Assets
The
configuration managed assets are created from the New Asset Assemblies (CM)
application.

Management of CM Items in Inventory and Purchase and receiving of CM Assets
How the inventory management of CM items is achieved in Maximo, is summarized in the image below.
Points of consideration for procurement of CM Assets:
- To
create a purchase order for and receive configuration managed assets in
Maximo, few things need to be configured first:
- Create
a CM Item and associate it with a standard rotating item in inventory.
- A
model should be created and associated with the above CM item and a label
system. The variation status of the model configuration needs to be
activated after clearing the abstract checkbox. Also, a revision of this
model needs to be active.
- Creation
of PO
- In
the PO lines tab, after selecting the rotating item, the ‘CM Item?’
checkbox needs to be selected.
- When
the above checkbox is checked, in the CM Details section, the CM Item,
Model and Variation fields become Mandatory. Label needs to be specified
too.
- Approval
of PO
- The
user that is used to approve the PO record should have the PO Limits
defined in its security group.
- Receiving
the Ordered Items
- Receipt
of the CM item is allowed if a holding location is available for the site
in which PO is created
- After
receiving the ordered items and saving the record in Receiving (CM)
application, one must go to New Asset Assemblies - Receiving (CM)
application from the Assets module to create the configuration managed
asset and complete the receipt.
- In the New Asset Assemblies - Receiving (CM) application, asset can be created by adding the PO Number and the line number.
See
the image below with an example to set up a CM item in Inventory and procure
the asset associated with it.

References
- https://www.ibm.com/support/knowledgecenter/en/SSLKSJ_7.6.2/com.ibm.acm.doc/c_prod_overview.html
- https://www.ibm.com/developerworks/community/wikis/home?lang=en#!/wiki/IBM%20Maximo%20Asset%20Management/page/BDI%20Overview%20and%20Administration%20Guide
- https://www-01.ibm.com/support/docview.wss?mhq=Asset%20Configuration%20Manager&mhsrc=ibmsearch_a&uid=swg21967991
- https://www-01.ibm.com/support/docview.wss?mhq=Asset%20Configuration%20Manager&mhsrc=ibmsearch_a&uid=swg21968895
- https://www-01.ibm.com/support/docview.wss?mhq=Asset%20Configuration%20Manager&mhsrc=ibmsearch_a&uid=swg21965975
- https://www.ibm.com/support/knowledgecenter/en/SSLKSJ_7.6.6/com.ibm.acm.doc/plusacm/c_cm_items.html
- https://www-01.ibm.com/support/docview.wss?uid=swg21967694
Tuesday, 4 September 2018
Random Examples of Maximo Automation Scripts
So far I have blogged about various capabilities offered by automation scripts in Maximo 7.6, needless to say I love working with Automation Scripts. I would like to share some random examples and usage of automation scripts in this blog. Please put your comments or suggestions.


Now, this condition 'CHECKLIMIT' is ready for use in the PO approval workflow process or in conditional UI to restrict the user in approving the PO record.
References:
Calling a Stored Procedure from Automation Script
I have a stored procedure in the database created as below:
This procedure needs to be executed on a scheduled basis. I can create a cron task or an escalation which will trigger the action. And, this action I can create as an automation script with Action launch point. The code snippet in this automation script will be as per the image below:

Throwing an exception in a Message Box using Automation Script
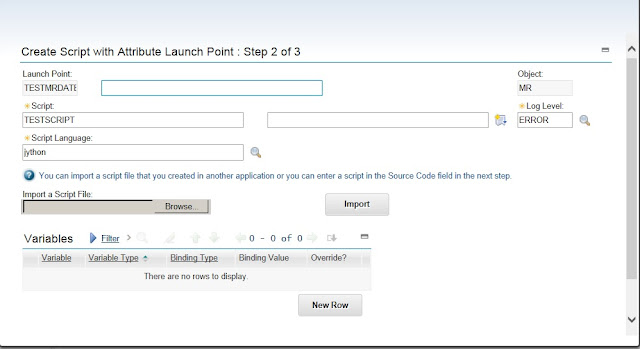
I have created a custom message in Database Configurations application which needs to be displayed to the user when the user selects a date less than the current system date while selecting required date in Create Requisition application.

I will create an automation script of Attribute Launch point with validate event on MR.REQUIREDDATE attribute as per the images below:


Taking action from Yes/No button in Message Box using Automation Script
Let us consider we have to throw a warning message with Yes or No button, and the user can select either of them. Based on the choice of the user, we need to take separate actions. The warning message is created in the Database Configurations application as below:

My requirement is when I select the Issue Unit for an item record in Item Master application, if an order unit is available and issue unit and order unit are not same, user needs to be thrown warning message with a choice if he/she wants to proceed. In case the user selects yes, nothing needs to be done but if the user selects no, the value needs to be cleared from the Issue Unit field. I will create an automation script with Attribute Launch point on ITEM.ISSUEUNIT attribute and event Run Action, as per the images below:


My requirement is when I select the Issue Unit for an item record in Item Master application, if an order unit is available and issue unit and order unit are not same, user needs to be thrown warning message with a choice if he/she wants to proceed. In case the user selects yes, nothing needs to be done but if the user selects no, the value needs to be cleared from the Issue Unit field. I will create an automation script with Attribute Launch point on ITEM.ISSUEUNIT attribute and event Run Action, as per the images below:


Automation Script for Conditions
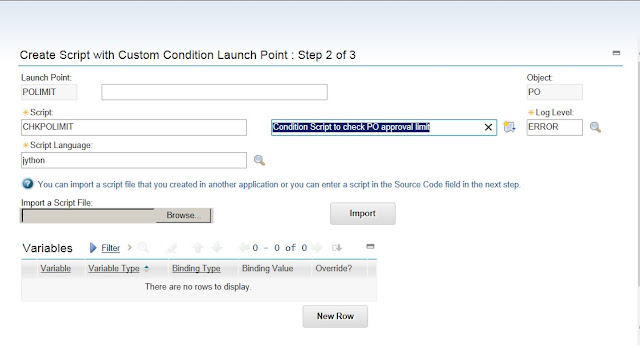
We can write automation scripts for custom conditions also which can then be used in workflows, or for achieving conditional UI, or in condition monitoring, etc. This type of automation script will be evaluated to either True or False and the boolean result is returned by the script using an implicit variable "evalresult".
Let us assume while approving a PO record, if the logged in user's PO approval limit is less than the total cost of the PO record, he should not be allowed to approve it. The automation script is created and source code is written as per below images.


Once the script is written, we need to define the condition expression to refer this script. In Conditional Expression Manager application, create a new condition of type=CLASS and in the expression field, enter the notation as <script-name>:<launchpoint-name> and in the class field, enter the class reference as "com.ibm.tivoli.maximo.script.ScriptCustomCondition". See the image below.

Now, this condition 'CHECKLIMIT' is ready for use in the PO approval workflow process or in conditional UI to restrict the user in approving the PO record.
References:
Wednesday, 22 August 2018
Intricacies of Maximo ConfigDB
Few years ago, I had written a blog on errors encountered while applying the configuration changes to one or many database objects in Maximo. One of my acquaintances had asked me to write a blog on the intricacies of configdb. Let us first understand why do we need to configure the database.
When we make some change to an object, say adding a new attribute or changing the length of an attribute, creating or modifying indexes, etc. or, may be we are adding a new object altogether in Database Configurations application, and when we click on the Save button, the changes are stored in temporary database configuration objects (secondary tables) and these changes do not take effect until you apply the configuration changes. It is important to back up your data before configuring the database. However, if we want to add a new relationship to an object or we want to modify a few relationships, once we save the record in Database Configurations application, they can be used and we do not need to apply the configuration changes. A relationship is a link between two MBOs, which is created by specifying a SQL Join statement.
There are three ways to configure the database: command-line mode, a full live configuration, or a partial live configuration with administration mode turned on. If you want to use the command-line mode, you must shut down the application server. It is easier to restore data from this configuration mode as there are no updates while the database is being configured. While restarting the application server, you need to ensure that you do not encounter internal 500 error. I had also written a blog on internal 500 error. You can refer to that if you like.
Full live configuration has least impact on users as active transactions are not interrupted or lost as administration mode need not be turned on in this case and this can be used only for non-structural changes to Maximo objects. Partial live configuration requires administration mode to be turned on which blocks users from the system applications, disables event listeners, suspends cron tasks, and does not allow remote connectivity. We should know when to use what configuration mode. For this, we need to understand the difference between a structural and a non-structural change. Before that let us also find out what are MBOs and its attributes.
Maximo Business Objects and Attributes
A business object is an object that has attributes and values, operations, and relationship to other business objects. The business object contains the business data and models the business behavior around it. The Maximo Business Object (MBO) defines a set of fields and business rules and updates one or more Maximo database tables. These can be of two types - Mbo and MboSet. MboSet is a collection of Mbo objects, which has methods to manipulate, iterate and query through the data. This can be considered as a database table. Mbo represents a record in a table which implies that each MBO represents a single database record from a single database table.
Information about a business object, which is referred to as metadata, is stored in the database in database tables. The metadata that is associated with the business objects is used to manage the database objects. This metadata for a business object may include the following:
- Definition of the Business Object - Name of the object, database entity, whether the object is persistent or non-persistent, the underlying java class
- Attributes - Name, data type, length or size, field validation class
- Associated Relationships - associations between tables that are created using join statements to retrieve data.
The Attributes of business objects contain the data that is associated with a business object. When you create an object, you must specify the attributes that are assigned to the object. These attributes can either be persistent or non-persistent. A persistent attribute represents a database table column or a database view column. A non-persistent attribute exists in memory only, because the data that is associated with the attribute is not stored in the database. The additional metadata that is associated with business object attributes, can include a domain, a custom class, a default value, and to specify whether the attribute is required, etc.
Structural Vs Non-Structural Database Change
The changes made in the Database Configurations application has the ability to change not only the data schema but also the data dictionary tables which store information about the tables, fields, and views used by Maximo. You can check the list of data dictionary tables here.
There is also a set of shadow data dictionary tables which are known as the CFG tables, which store the necessary changes made in the Database Configurations application until you are ready to apply those changes to the database. So, the changes which are made in the Database Configuration application are actually written into the CFG tables and after the DBConfig process is successful, the changes are written into the data dictionary tables which may alter the schema of the database or reconfigure particular attributes.
A non-structural change to Maximo object does not disrupt the live business object definition. For example, if we change the field validation class for an attribute or we add a domain to an attribute and perform a live update to apply the changes, the business objects that are already instantiated are not re-validated. Modifications to indexes do not use the CFG tables but use two other Maximo objects, MAXSYSINDEXES and MAXSYSKEYS. These changes are also considered as non-structural and hence, do not required admin mode to be turned on before configuring the database.
A change which may alter the data schema, like the ALTER, CREATE, DROP statements in SQL, is termed as as Structural change, like, creating or deleting a Maximo object, changing the data type or length of an attribute, etc. A structural change may alter the transaction table. For certain structural changes, Maximo will automatically rename the original table with an XX prefix during the configuration process and these tables will serve as backed up data. This would be for major modifications, like data type changes which cannot be made on a table with data in it. The configuration process reconstructs the table schema and restores the data from the backup. These backup tables will be retained so as to be used in case you need to do a roll back of the configuration process, and they can be deleted periodically by an administrator. Turning admin mode on allows the structural changes to be applied to the database without stopping the application server.
Changes to the structure should only be done through the Database Configuration application and not directly through the database. This will ensure that all Maximo rules are observed. After doing the changes in the database configuration, the system will then take care to do the changes to the underlying database, if any are needed.
Using Database Configuration Application - WHY?
An object is a self-contained software entity that consists of both data and functions to manipulate data. User-defined objects are always created in the Database Configuration application. All changes should be performed from here, as this will ensure the integrity and upgrade-ability of your configuration.
When adding a new MBO, there are several settings which one should configure. Just to mention a few, you can set a “Custom class” which will tell Maximo which Java class has the logic to be used with this MBO. You can also set the MBO to be a View or enable Auditing for this MBO. So, it is not as simple as creating a new table in the database using CREATE TABLE statement.
When we are creating a new object in Maximo database, it is not as simple as creating a new table in the database using CREATE TABLE statement in the native database. The changes should be saved in the Data Dictionary tables else we cannot use it from Maximo instance. The object details will be saved in MAXOBJECT table which may be based on MAXTABLE or MAXVIEW. Details of the attributes of this object will be saved into MAXATTRIBUTE table, details of indexes will be saved in MAXSYSINDEXES and MAXSYSKEYS tables, and details of relationships will be saved in MAXRELATIONSHIP table, details of the columns for the view will be saved in MAXVIEWCOLUMN, and MAXSEQUENCE table will store all the sequences used in the system.
When we create the new object in Database Configurations application and save the record, details are saved in the shadow tables, MAXOBJECTCFG, MAXATTRIBUTECFG, MAXTABLECFG, MAXVIEWCFG, etc. During the partial live configuration process, the system runs the CREATE TABLE statement in the native database and also inserts the changes into the data dictionary tables as mentioned above. Once the configuration process is successful we will be able to access this object in the Maximo instance.
We can create a native view directly in Maximo database using CREATE VIEW statement, then we can come into Database Configurations application and click on New Object icon, provide the same name of the view created above in the Object field, "Imported?" and "View?" checkboxes will get automatically checked, and "View Select", "View From", and "View Where" fields will be populated with the appropriate portions of the SQL statement. When you save these changes in the Database Confugurations, the details are written to MAXOBJECTCFG, MAXATTRIBUTECFG, MAXVIEWCFG tables and after the configuration changes are applied with admin mode turned on, these changes are written into MAXOBJECT, MAXVIEW, MAXATTRIBUTE, etc. tables and you can access the view in Maximo UI. You can refer the youtube video for the same.
References:
Tuesday, 7 August 2018
Leveraging Automation Scripts for Inbound and Outbound processing of messages
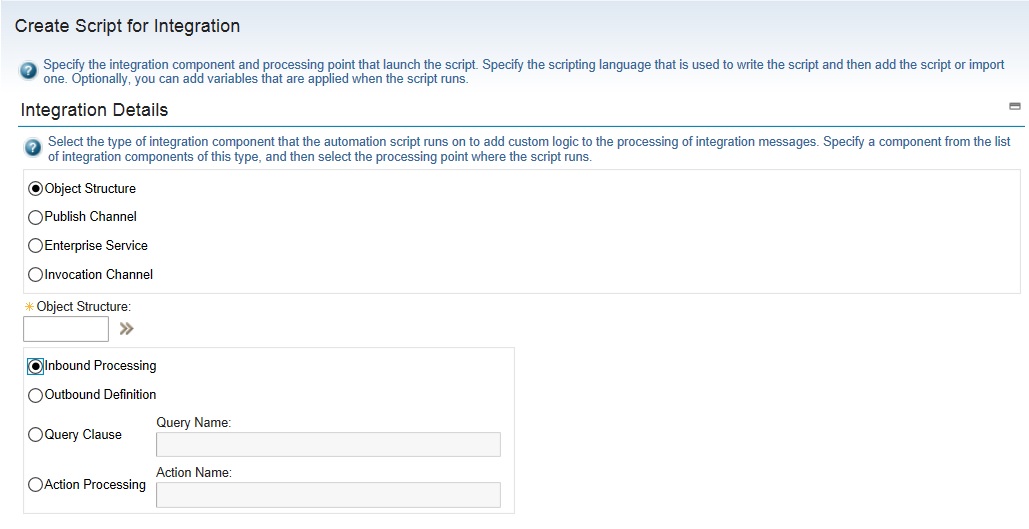
We have used java classes to extend the main java processing classes to customize the processing of integration messages for inbound and outbound transactions. Maximo 7.6 has given us the capability to leverage automation scripts to apply our custom logic to integration components. We can create automation script and associate it to an object structure, enterprise service, publish channel, etc. To create an automation script for integration, in the Automation Scripts application you need to select the action Create > Automation Script for Integration.

Next, you will have to select the integration component on which the automation script will run to apply your custom logic. Before that we need to understand what are the different customization points for inbound and outbound transactions that are available with automation scripts.
- The automation script for outbound object structure allows an outbound definition to be created which will have the custom processing code to be used during serialization of business object data into an XML message. The automation script for inbound object structure allows an inbound processing of the incoming XML message before it is mapped to the business data. The automation script name will be created by the system as OSIN.<object-structure name> for inbound processing or as OSOUT.<object-structure name> for outbound processing.


- Object structure processing creates the integration message which is then forwarded to the publish channel for outbound transaction. Custom logic can be written in an Automation scripts to process the publish channel further, through either External Exit, user exit before external exit, user exit after external exit or event filter processing. If the publish channel selected for the automation script is MXINVENTORYINTERFACE, then the script name will be as below:
- PUBLISH.MXINVENTORYINTERFACE.EXTEXIT.OUT (External Exit)
- PUBLISH.MXINVENTORYINTERFACE.USEREXIT.OUT.BEFORE (User Exit before external exit)
- PUBLISH.MXINVENTORYINTERFACE.USEREXIT.OUT.AFTER (User Exit after external exit)


- After successful creation of the automation script for the publish channel, in the Publish Channels application, you can see that predefined class references get auto-populated in Processing class, User Exit Class or Event Filter Class fields. The processing class field will have the value as "com.ibm.tivoli.maximo.script.ScriptExternalExit" if we have used external exit with the automation script or the user exit class field will have the value as "com.ibm.tivoli.maximo.script.ScriptUserExit" if we have used user exit class.
- For outbound integration messages, Maximo will start an integration transaction. The object structure provides an internal record data (irData) element to a publish channel, which is then processed through a custom logic and an external record data (erData) element is constructed before the message is forwarded to its destination. We have created an automation script (PUBLISH.ES_MXITEMINTERFACE.EXTEXIT.OUT) with a publish channel that is created on MXITEM object structure. In this object structure, we have included a non-persistent attribute "ITEMNAME_NP" which should be combination of item number and description which needs to be sent in outbound transaction. The source code is as below:

- Enterprise service provides asynchronous and synchronous processing of inbound integration messages. During asynchronous processing, external service opens a connection and sends a enterprise service request and does not require a response. However, during synchronous processing, external service opens the connection to send the enterprise service request and will maintain the connection till a response is received. Automation scripts provide the following customization points during the processing of inbound or outbound integration messages to be used with enterprise services:
- Inbound Request - User Exit before external exit - SYNC.<enterprise-service name>.USEREXIT.IN.BEFORE
- Inbound Request - User exit after external exit - SYNC.<enterprise-service name>.USEREXIT.IN.AFTER
- Inbound Request - External Exit - SYNC.<enterprise-service name>.EXTEXIT.IN
- Outbound Response - User Exit before external exit - SYNC.<enterprise-service name>.USEREXIT.OUT.BEFORE
- Outbound Response - User exit after external exit - SYNC.<enterprise-service name>.USEREXIT.OUT.AFTER
- Outbound Response - External Exit - SYNC.<enterprise-service name>.EXTEXIT.OUT


- After successful creation of the automation script for enterprise service, you can see in the Enterprise Service application, for this enterprise service record predefined class references get populated as "com.ibm.tivoli.maximo.script.ScriptExternalExit" in the processing class field or as "com.ibm.tivoli.maximo.script.ScriptUserExit" in the user exit class field.
- For inbound integration messages, external system starts the integration transaction and the incoming integration message provides an erData element to an enterprise service. Through a custom code, this element is processed to construct an irData element before the message is forwarded to the associated object structure. Let us assume that we are using out of the box enterprise service, 'MXPOInterface' to processes inbound messages to MXPO object structure. If for any incoming PO record, buyer (PURCHASEAGENT) is null, we need to use the value of the person who has initiated the PO record in this field before saving it to PO object. Automation script is created as per the image below:


After the above automation script is created, you can see in the related enterprise service record, processing class field is auto-populated with the predefined class reference. See the below image:

In case you want to delete the above script, please remember to remove the class reference explicitly from this field in the Enterprise Services Application.
References:
Subscribe to:
Posts (Atom)